HubSpot recently made a big upgrade to Marketing Events. Before, it was only useful in a few use cases. And probably not for you. Today, thanks to the upgrades, HubSpot Marketing Events have become incredibly powerful for marketers who run events and webinars.
Together with Ryan Gunn from Attribution Academy we hosted a webinar on all the ins and outs about the updated Marketing Events to discuss:
- What they are and how to use them
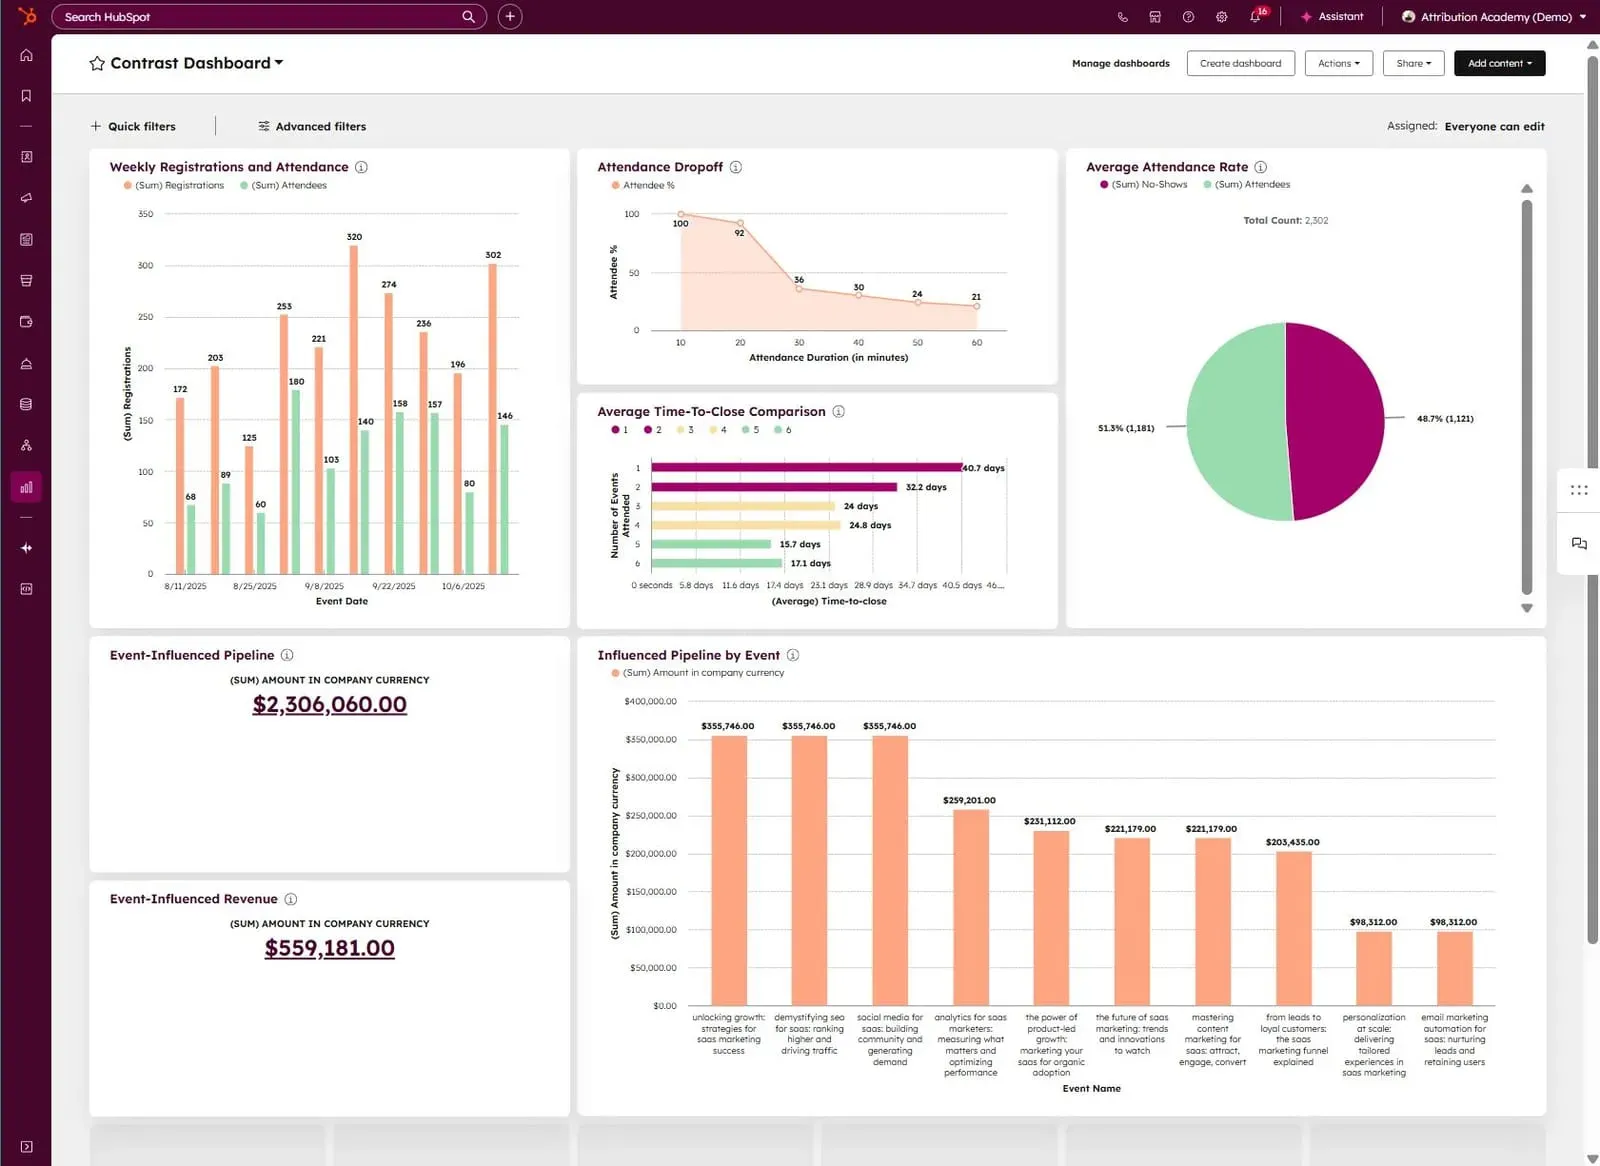
- How to build the best webinar reporting dashboard in HubSpot
- Advanced use cases (event attribution, lead scoring, ICP self-selection, retargeting)
- Notify contact owners on Slack or Teams
Watch the full session here:
Follow this step-by-step guide (which we probably should have made a paid course, it's so good!) and learn how you can start using Marketing Events for your company. Whether it's simply building lists from your events and webinars, reporting dashboards, or things like lead scoring – we'll walk you through it and explain it in this guide.
What are HubSpot Marketing Events?
Let's start with the basics. Or skip ahead if you're already familiar. HubSpot marketing events are a CRM object used to track and manage data from both online and offline events, such as webinars, conferences, and product launches. This feature allows you to associate contacts with specific events, view registration and attendance details on their contact records, and analyze your event performance all in one place.
You can create events manually or connect apps to automate data import and track attendees and no-shows.
Before the big update in October, marketing events were somewhat hidden within HubSpot. They were tucked away in a less accessible part of the platform, which led to many users overlooking their potential.
At the start, the functionality was limited primarily to Zoom webinars, which restricted the scope of data that could be captured and utilized. Now it's available to any integration that supports Marketing Events like Contrast.
What has changed since HubSpot updated Marketing Events:
- Data Import and Integration: Users can now import attendee and registration data manually, which is particularly useful for in-person events. Additionally, integrations with platforms like Contrast allow for seamless data flow into HubSpot.
- Easier to use data: Marketing events now support a variety of data points, including registrations, attendance, cancellations, and attendance duration. This data can be used to create lists, reports, and workflows, opening up new possibilities for actioning event data.
Why this matters:
- Real-Time Updates: By integrating with webinar platforms, marketing events can provide real-time updates, ensuring that sales and marketing teams have the most current data at their fingertips.
- Behavioral Insights: The ability to track attendance duration and engagement provides deeper insights into attendee behavior, allowing for more targeted follow-up and nurturing strategies.
- Cross-Platform Integration: With the addition of more integrations, marketing events can now pull data from various platforms, making it easier to consolidate and analyze event data within HubSpot.
New use cases thanks to Marketing Events
- Lead Scoring and Segmentation: By using marketing events data, businesses can enhance their lead scoring models, prioritizing leads based on their engagement with events.
- Attribution and Reporting: The data from marketing events can be used to build detailed attribution reports, helping businesses understand the impact of their events on revenue generation.
Alright. Now that you know what has been updated – and why this is useful to you, let's look at how you can start using Marketing Events for your events and webinars.
Is Your Webinar Platform the Right Fit?
This is hopefully hardly a surprise. Your webinar platform matters. You knew this. So you did your homework when you bought your current platform.
But did you have time to dive into the nitty gritty details when you're purchasing your webinar platform? Probably not. You start using it, and then find out that you were overpromised – and you guess it, the webinar platform and its integration are underdelivering.
So let's put out a few red flags that you can pay attention to when purchasing a new webinar platform. Or perhaps, evaluate your current platform on.
- They don't yet work together with HubSpot Marketing Events
- You need to manually create lists/segments on HubSpot by using filters
- You can't act on your leads while they're hot – not when you have time to sync data, or worse upload a CSV
- The lists/segments you create are static, so you need to update them all the time
- The info you get about attendance is if they attended or not...
- Registration and view data is always overwritten so you lose history
If you want to have a webinar platform with a plug-and-play native HubSpot integration – you should check out Contrast. It's the #1 webinar platform rated and fasted growing HubSpot integration on the marketplace.
Now, let's get into the guide.
Want to Run Better Webinars?
Get a personalized demo and see how Contrast can elevate your webinars
Book your demoAutomate follow-up based on attendee behavior
You can't expect everyone in your webinar to book a demo right after it's over. That means, your follow-up needs to be strong so that you can turn all those attendees into demos booked.
Doing this manually is a crime. Unless you had 6 signups of course. Let's look at how we can automate our follow-up simply based on how they have interacted with your webinars.
Step 1: start by defining your key triggers
Determine which attendee actions should trigger workflows. Common triggers include event registration, attendance, poll responses, and specific engagement levels (e.g., attending more than 50% of the event).
Perhaps you're getting so many registrations that you don't even care about them. In that case, you'll likely only focus on live viewers. Getting so many live viewers that even sorting these out is difficult? Focus on the ones that watched 80% of the webinar or more.
You get the point. The type of triggers you define depends on your current webinar strategy – and the results you're getting with them. Over time, you'll find yourself fine-tuning these triggers based on the results you're getting. What's important now, that you get started.
Keep in mind, that the type of triggers available to you also have to do with the webinar platform you're using. Some platforms give more data than others.
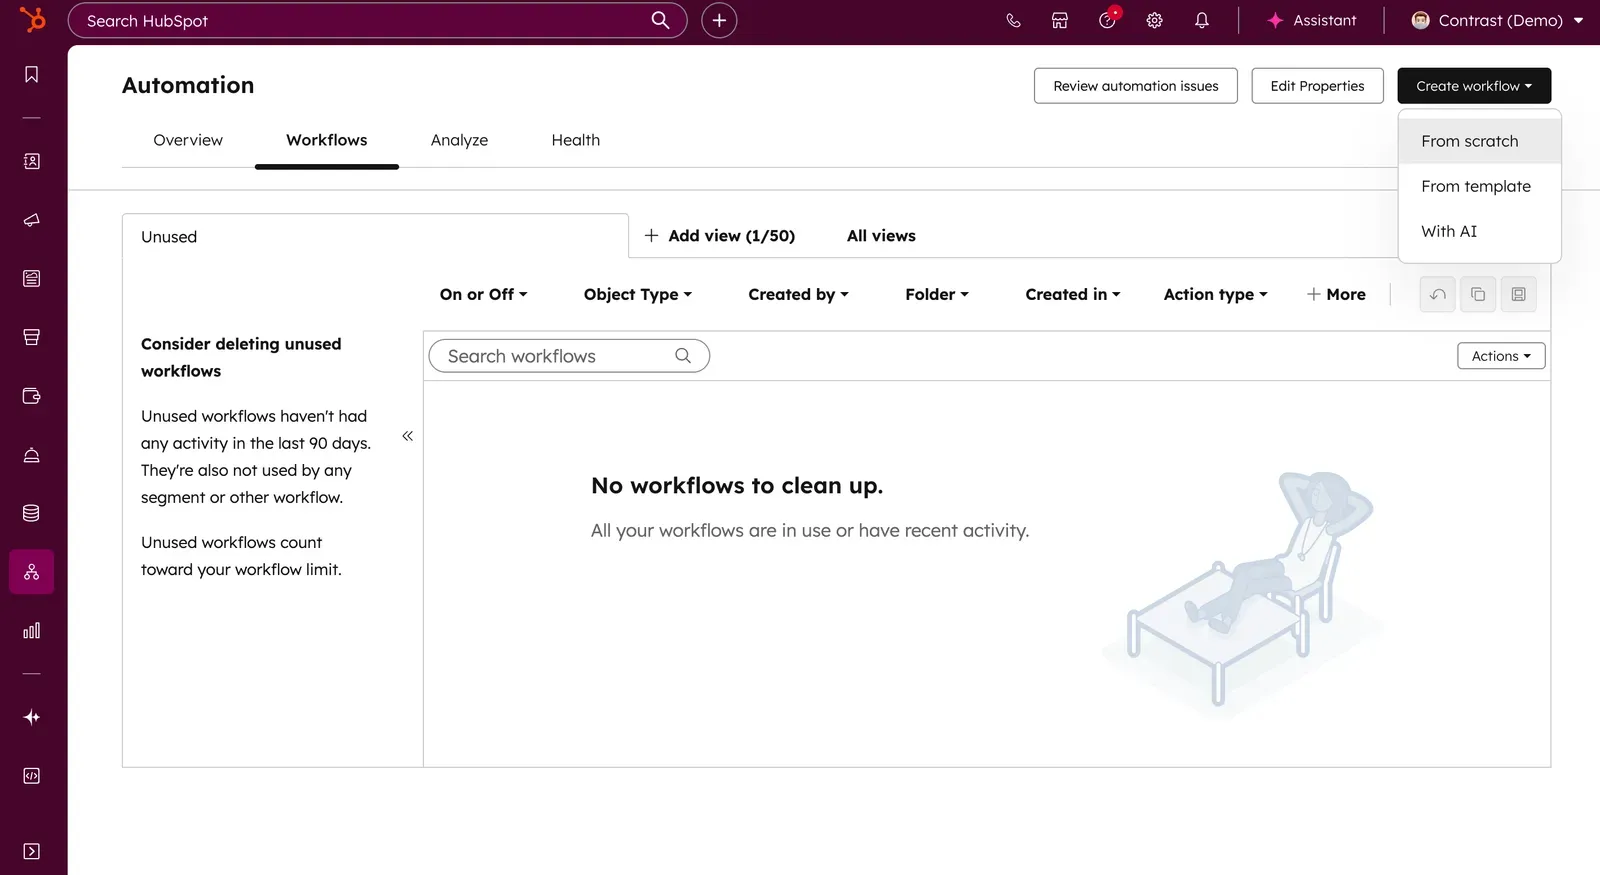
Step 2: Let's setup workflows in HubSpot
- Navigate to the "Workflows" section in HubSpot.
- Create a new workflow and select the appropriate trigger criteria (e.g., "Event Attendance" or "Poll Response").
- Define the actions that should follow the trigger, such as sending a follow-up email, enrolling the contact in a nurturing sequence, or notifying the sales team.
- Test and Activate: Before activating, test the workflow to ensure it functions as expected. Once confirmed, activate the workflow to automate your follow-up processes.
Prioritize leads based on engagement
You can use HubSpot's Lead Scoring feature to spot highly engaged prospects. Especially for companies that already have a webinar strategy in place, this is one of the easiest low effort things you can do to filter out the signal from the noise.
Basic Lead Scoring with Registration and Attendance
Let's start with the absolute minimum. Score leads based when they register to a webinar and attend one. These are called your scoring criteria. We'll later expand on more advanced use cases – for now we keep it simple.
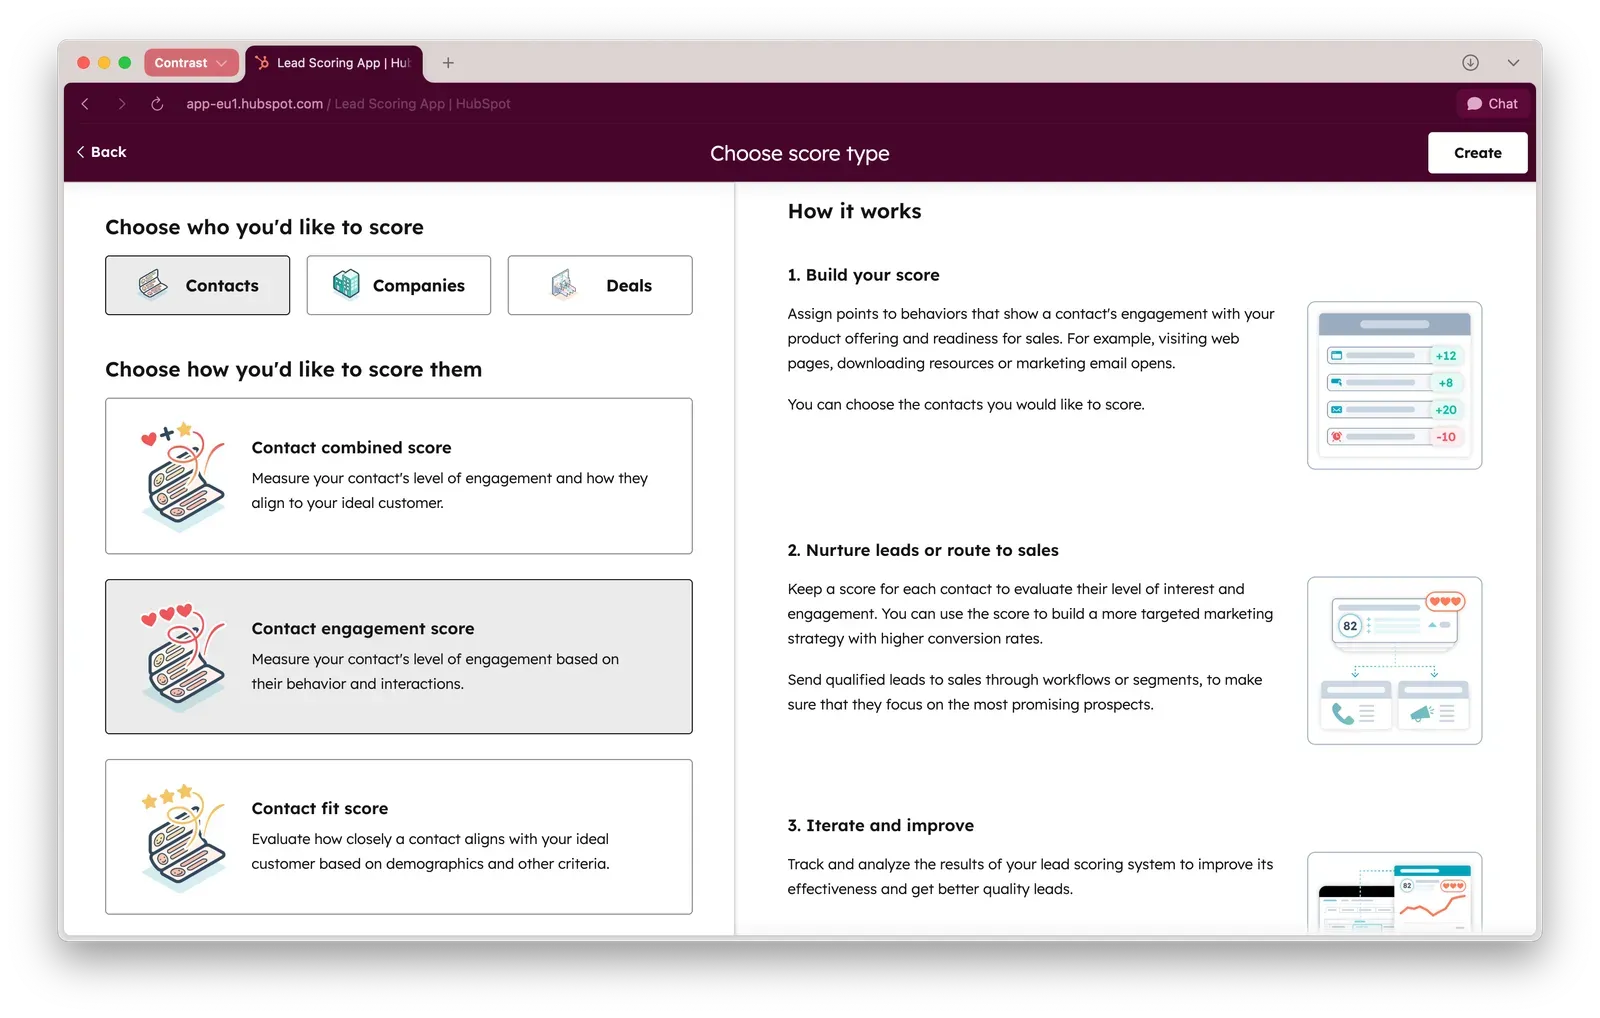
In HubSpot, open "Lead Scoring". Now select Contact Engagement Score and click on Create (top right).
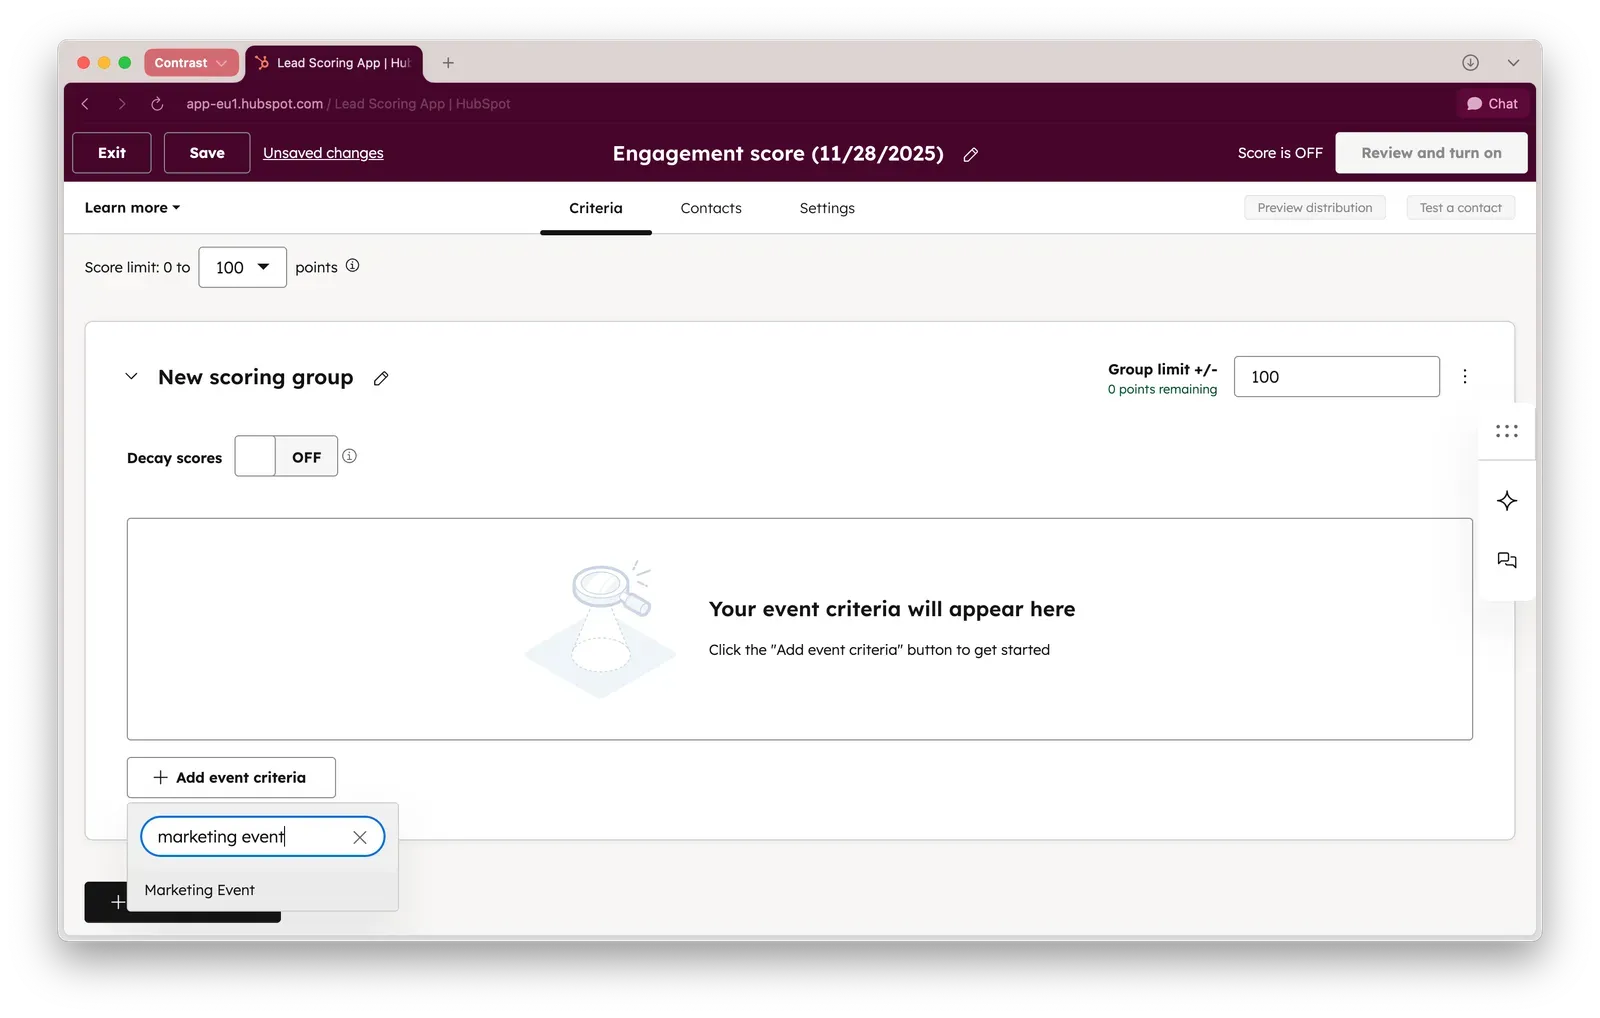
This panel will open in where you can set up your Lead Scoring logic. At the bottom you'll find "Add event criteria". Now search for "Marketing Event" by typing in the search field.
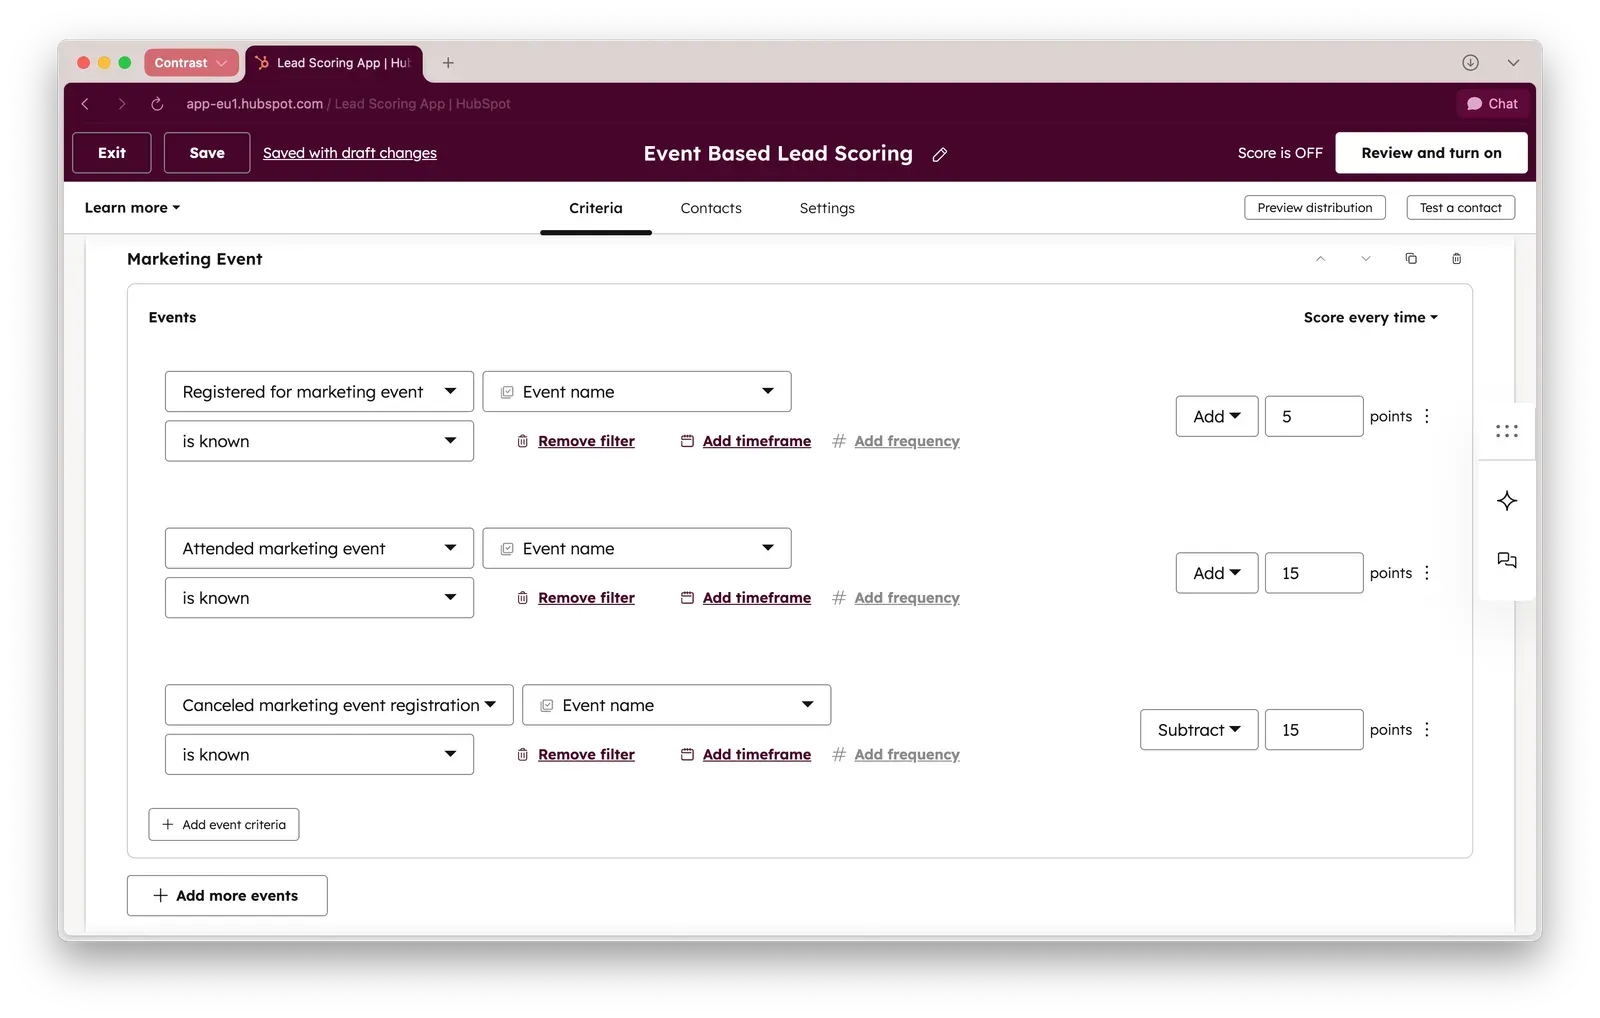
Now let's set up the basic criteria for counting points for every time a contact registers to an event or webinar. In the dropdown field, look for "Registered for marketing event". Set the event name to be known so we're sure it only add points to people who actually attended an event.

Now attribute a number of points for every time a contact registers. In this example we have chosen 5 points. It's up to you to select the number of points that make sense for your business and event strategy.
It goes without saying that we care more about people who attend our events – than people who just register. So let's set up the scoring in a way that reflects this. We follow the same steps as before. The only thing that is different is the number of points we allocate for attendance. In our example we choose 15.

Things are starting to take shape. We now score leads if they:
- Register to one of our events or webinars [+5 points]
- Attend to one of our events or webinars [+15 points]
In case it's possible for registrants to cancel their participation to your event or webinar, we should also take this into account. Use the "Canceled marketing event registration" event for this. Now follow the same steps as before – but substract(!) 15 points in case this happens.
Your Lead Scoring setup should look like this. Of course with different scores, if you have set them up in that way.
Advanced Lead Scoring with engagement data
Alright. This is where a powerful webinar platform comes into place. What we showed in the basics is possible with almost every webinar platform. As the title suggested: it's rather basic.
If we critically look at our events and webinars, we care more about signals like did they watch live, or on replay. Did they answer polls. Or did they ask a questions? For most companies, these are the true high intend signals – and so we should score them higher!
Let's look at how it's setup. In this walkthrough we're going to use Contrast webinars. If you're not using Contrast, you might have different events available – or some might be missing completely. If these are important to you: you know what to do ;-)
Enough talk. Let's get started. Click on "Add more events" and search for "Integration Events". A list of events will open that are connected to connected integrations. Scroll down to you find Contrast, or the webinar platform you're using.
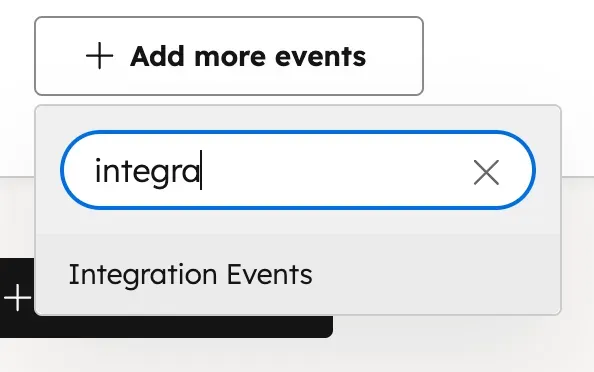
A list of events will open that are connected to connected integrations. Scroll down to you find Contrast, or the webinar platform you're using.
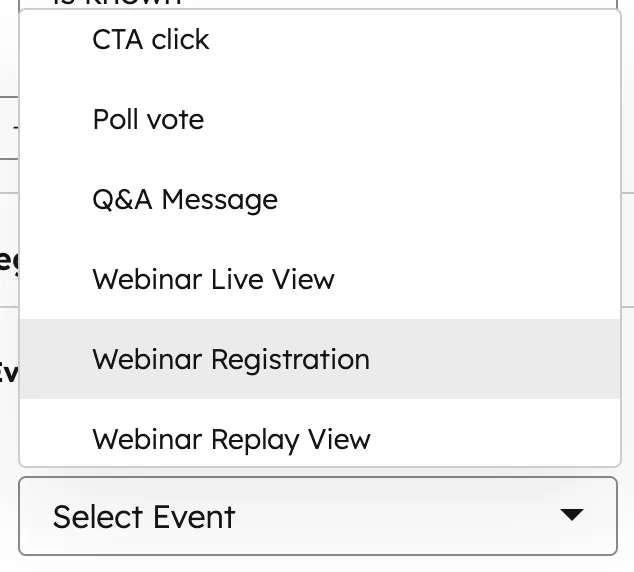
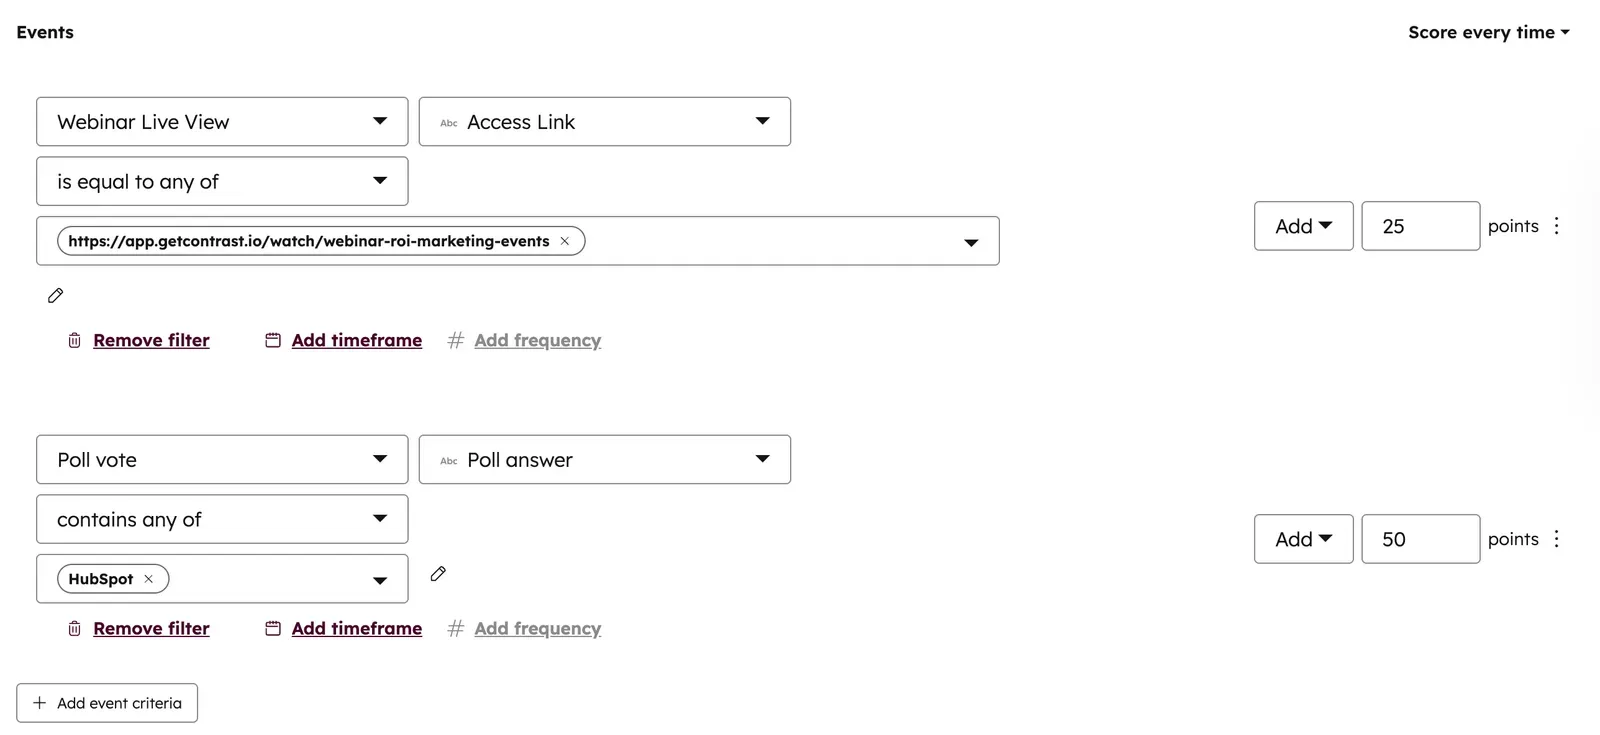
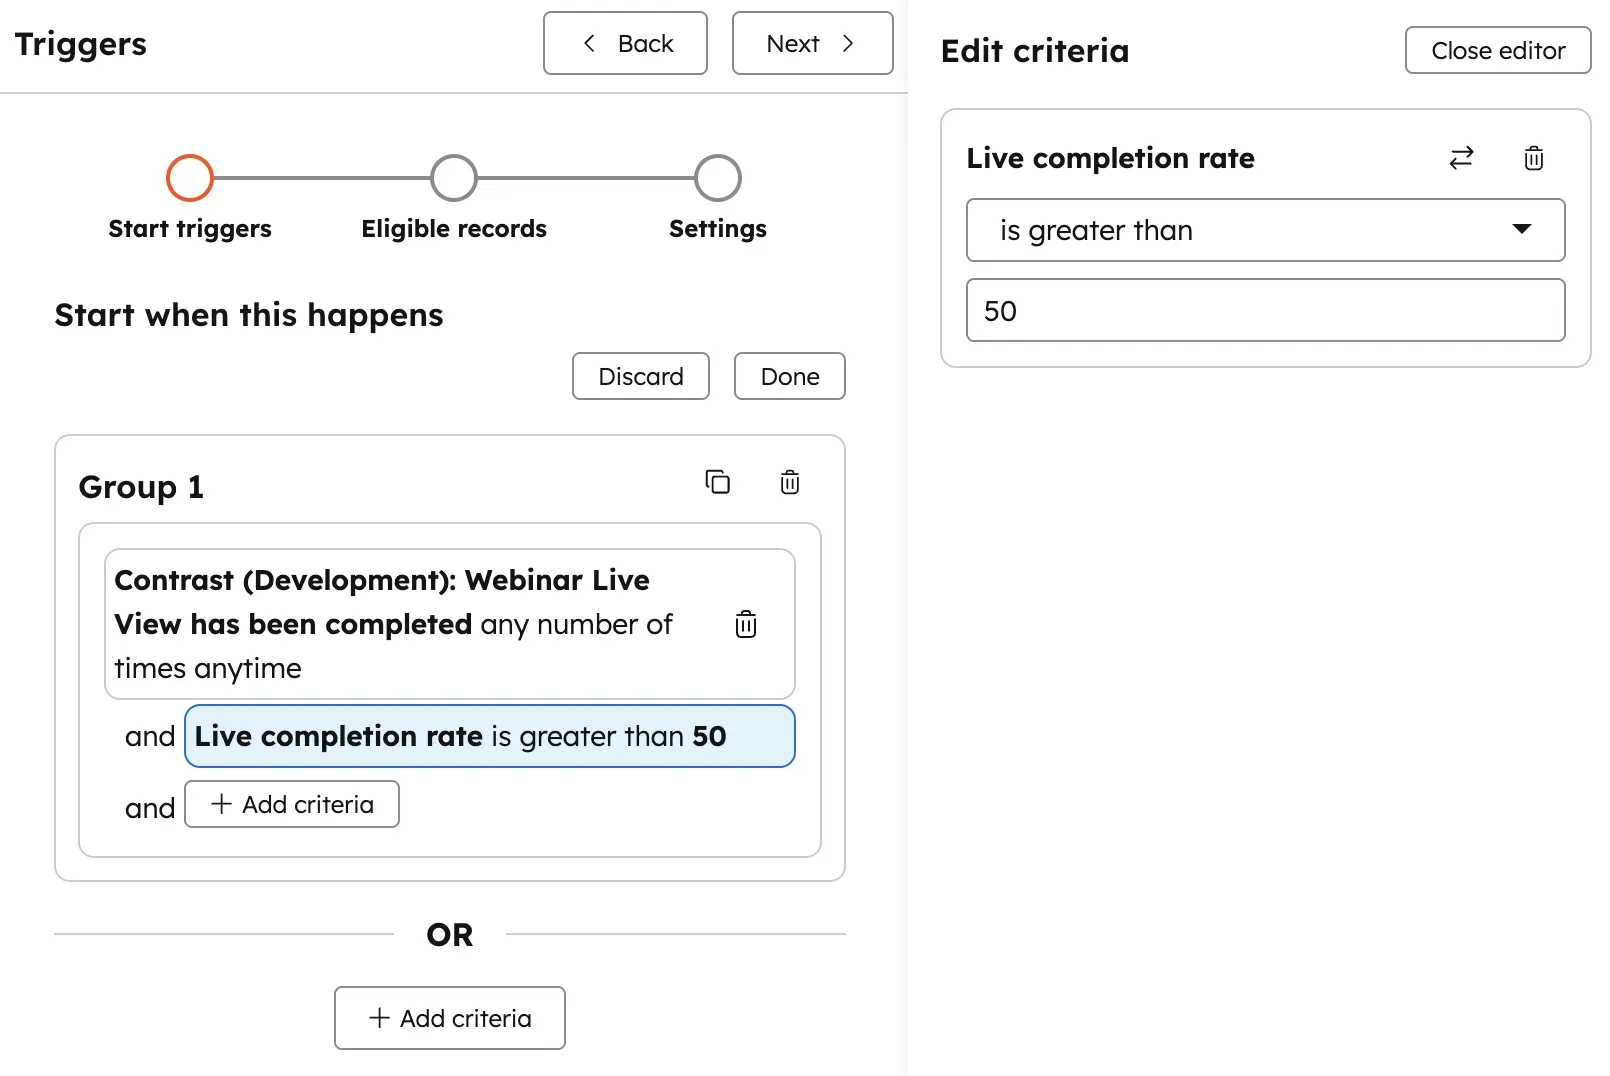
Before we said that a live view is more important than a registration. Fair. But just a live view doesn't say much. What if they dropped in the first 5 min of the webinar? Let's zoom in on the people who actually watched the webinar. We can do this by using the Webinar Live View and using the Live Completion Rate.
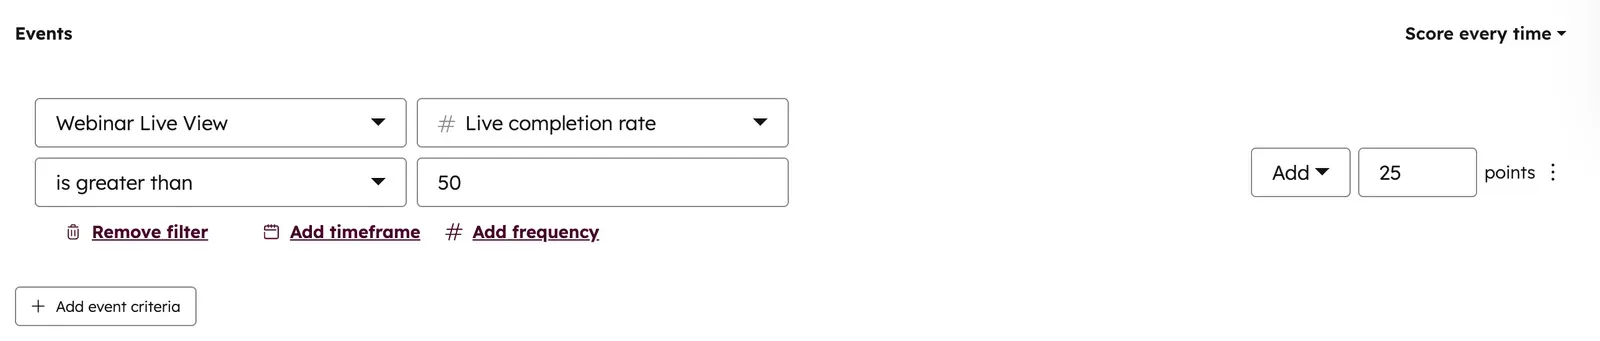
In this example, we award 25 points to a person who has watched more than 50% of the webinar. Of course you can set the criteria whichever way you want. Don't forget to set one up for a replay view as well.
Now let's look at engagement. You're running polls. Right? Please tell me you do. How do we turn those polls into signals your sales team can use to improve their follow up? Easy.
In this example, we award 35 points towards someone who answered a poll. That is what the Poll answer is known refers to. There's a chance your webinar platform doesn't send this data over to HubSpot. So please check that.

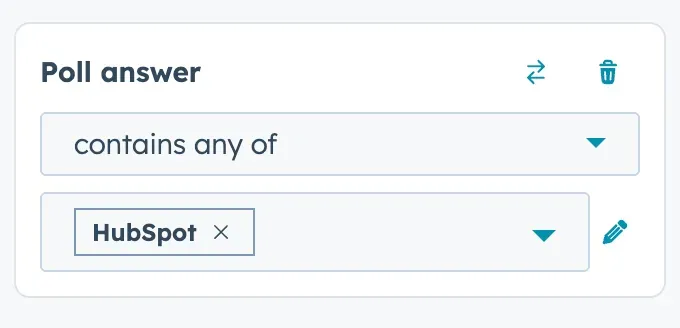
Perhaps you're interested in a specific poll answer. For example, in most of our webinars we ask what CRM people use. As Contrast is built for HubSpot – the best answer for us is obviously HubSpot. Let's look at how to set this up.
We're still looking at poll votes in combination with poll answer. This time, we set the filter to contains any of. Now we type in the poll answer we want to score for: "HubSpot". In this example, we're awarding 50 points for any contact that answers this during any webinar.

If you want to make this specific to a single webinar, you can. In the same block where you have set up the logic for your poll, add a filter option based on the access link of your webinar:
As we have shown before, there are many engagement signals you can score for. The setup in most cases is the same as we have shown for polls. Let's say you want to score people who asked a question during the webinar, you can use "Q&A Message" and assign a score. You'll likely also want to notify your sales team about this – because that's the perfect gateway for a follow up. We'll look at how to do that in a bit.
You can now preview the distribution and see out of all your contacts in HubSpot, how they would score. In our example down below, there are a lot of people who score very high. This is because we have forgotten one thing: time.
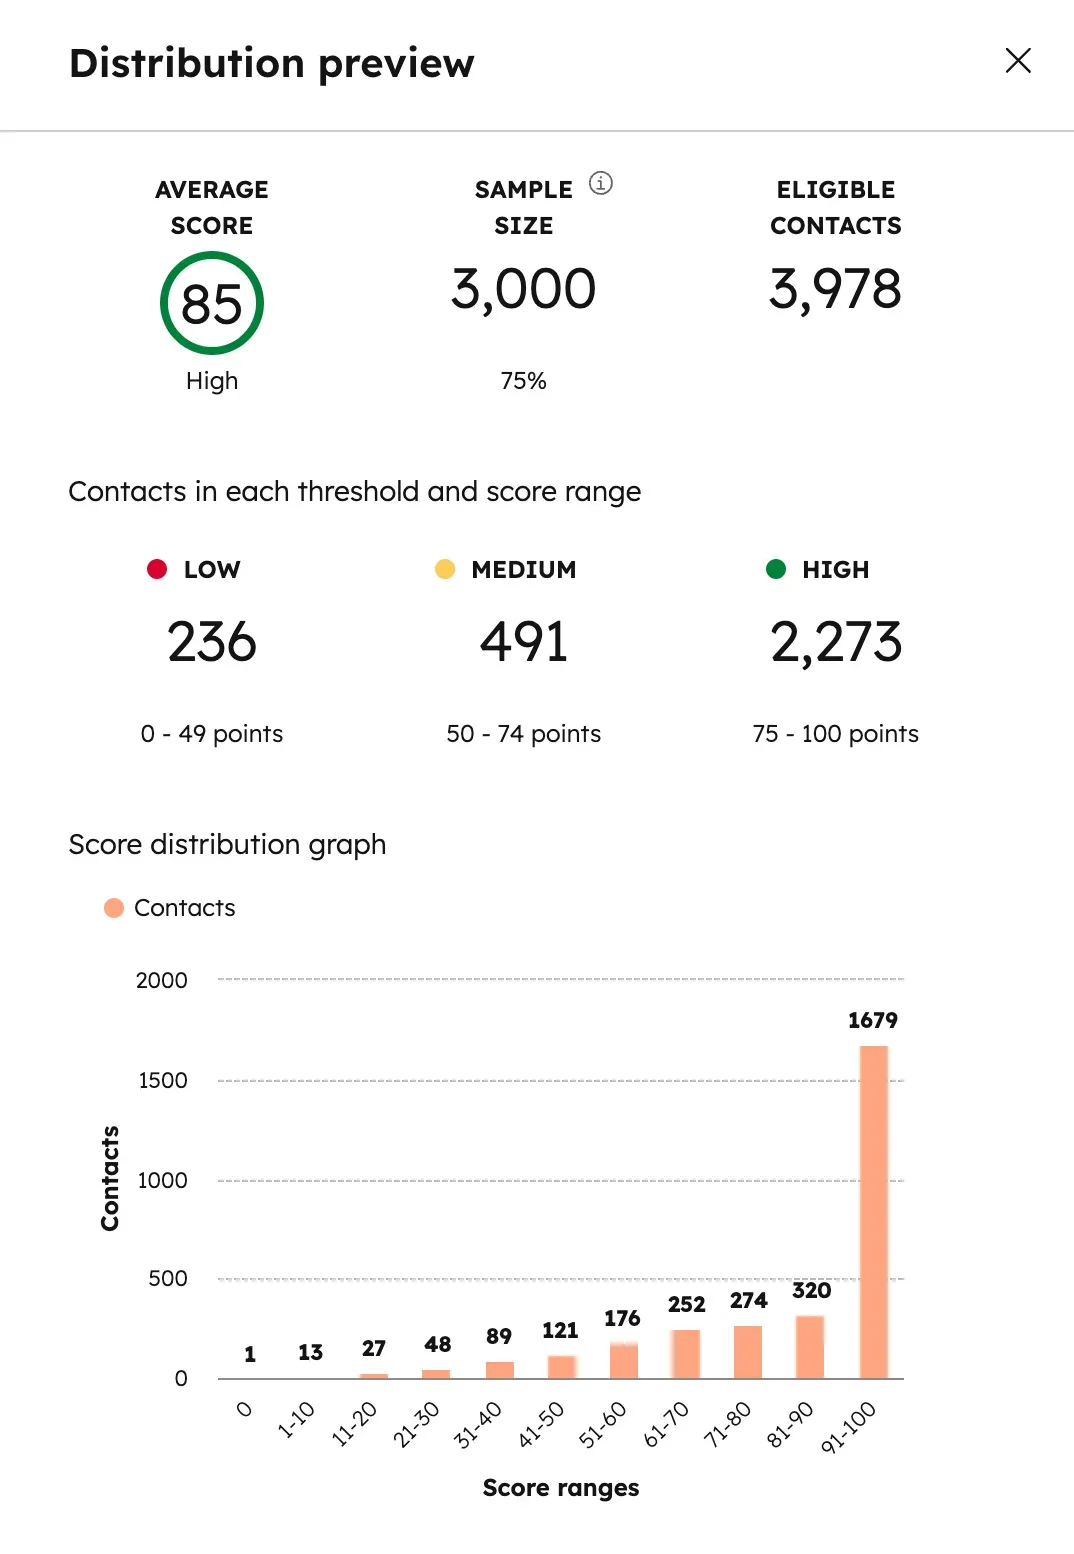
By adding a timeframe to our lead scoring setup we for example can only look at people who had activity in the last year. You want to play with this set up so that the right amount of warm leads come to the surface. Don't be afraid to adjust it over time – it's normal.

Another way to dampen the blow of time is to use decay. Implementing a time decay factor can ensure that more recent activities are weighted more heavily than older ones. For example, you might reduce the score contribution of an event by 50% each month to prioritize recent engagement.
How to organize your lead scoring at an organizational level
You can of course create all of this in isolation. However, it becomes real powerful when you start combining it with other data. Lead scoring can be further refined by combining Contrast data with other behavioral data, such as page views or e-book downloads. For example, visiting a pricing page might add more points to a lead's score, indicating a higher level of interest.
The Best Webinar Experience for your Viewers
Start for free with up to 30 registrants. No credit card needed.
Start for freeHow to use the lead scoring I have just set up?
If this is your first time having touched lead scoring in HubSpot – you're probably thinking "okay, now what?". If you already have experience, then feel free to skip ahead to the next section.
Lead scores are a powerful tool to prioritize leads. There are many different use cases for lead scores. But let's start with where you can view it. Your lead score appears as “HubSpot Score” on contacts; use it in views, lists, workflows, routing, and reports.
Where it shows
- On each contact record: The HubSpot Score property in the left sidebar (add it if you don’t see it).
- Contacts index table: Add HubSpot Score as a column to sort and filter.
- Lists: Use score-based criteria to build active lists (e.g., Score ≥ 50).
- Workflows: Branch logic off HubSpot Score to trigger actions when thresholds are crossed.
- Reports & dashboards: Use the score in the Custom Report Builder (e.g., distribution, conversion vs. score).
- Forms & chatbots (indirectly): They don’t “show” score, but submissions can change score via workflow or scoring rules.
- Predictive scoring (Enterprise only): Appears as separate predictive properties in addition to HubSpot Score.
How to use it in practice
Visibility and prioritization:
- Add HubSpot Score to your default Contacts view and sort descending to surface hottest leads.
- Save filters like “Score ≥ 60 AND Last activity < 7 days” for daily triage.
- Qualification and lifecycle
- Create a workflow: If HubSpot Score ≥ 50, set Lifecycle Stage to MQL, assign owner, and create a follow-up task.
- Add an internal notification when a contact crosses a threshold (e.g., 75) to alert Sales.
- Routing and SLAs
- Rotate leads to specific owners when the score is high, or send lower-score leads to nurture.
- Use score tiers (e.g., 0–24, 25–49, 50–74, 75+) to define SLA response times and playbooks.
- Nurture and campaigns
- Build active lists based on score to tailor email sequences and ad audiences (e.g., “Score 25–49: consideration content,” “≥75: BOFU demo offer”).
- Sync high-score lists to ads (Google/LinkedIn) for retargeting.
- Reporting and feedback loops
- Dashboard widgets: score distribution, meetings created vs. score, win rate vs. score.
- Review which scoring rules correlate with conversions; adjust weights to improve signal.
Common patterns that work
- Thresholds: 50 = MQL, 75 = hand-raise/SQL review, 90+ = immediate outreach.
- Decay: Add negative points over time without engagement to keep scores fresh.
- Channel weighting: Heavier points for product-qualified or high-intent actions (demo, pricing page), lighter for basic email opens.
- Fit + intent: Combine firmographic fit (ICP) with behavioral intent to avoid “noisy” high scores.
Wait, I can't find my lead score???
Alright, just do this:
- Add the property: On a contact, click “View all properties” and pin HubSpot Score to the sidebar.
- Permissions: Ensure you have access to view the property.
- Check object: Scoring typically lives on contacts; if you need companies, create a custom score property and sync logic via workflows.
Retargeting based on attendance and engagement
Routing leads based on poll responses is a strategic way to ensure that your sales and marketing teams engage with prospects in a personalized way. But perhaps you don't have time to follow up with every attendee in a personalized way – and you've been thinking about how to use the HubSpot prospecting agent for outreach to less engaged contacts?
In the next steps you'll find out how to use workflows, branching and choose specific actions such as setting a contact as non marketing contact. Let's dive right in.
Set ICP to marketing contacts
As always. Let's start with basic use cases so you can get the hang of it. And by doing this, you'll also save a bit of money on marketing contacts. We can use some of that webinar data to set non-engaged contacts to non-marketing contacts.
Start by creating a new workflow. As the trigger you "Webinar Live View" has been completed.
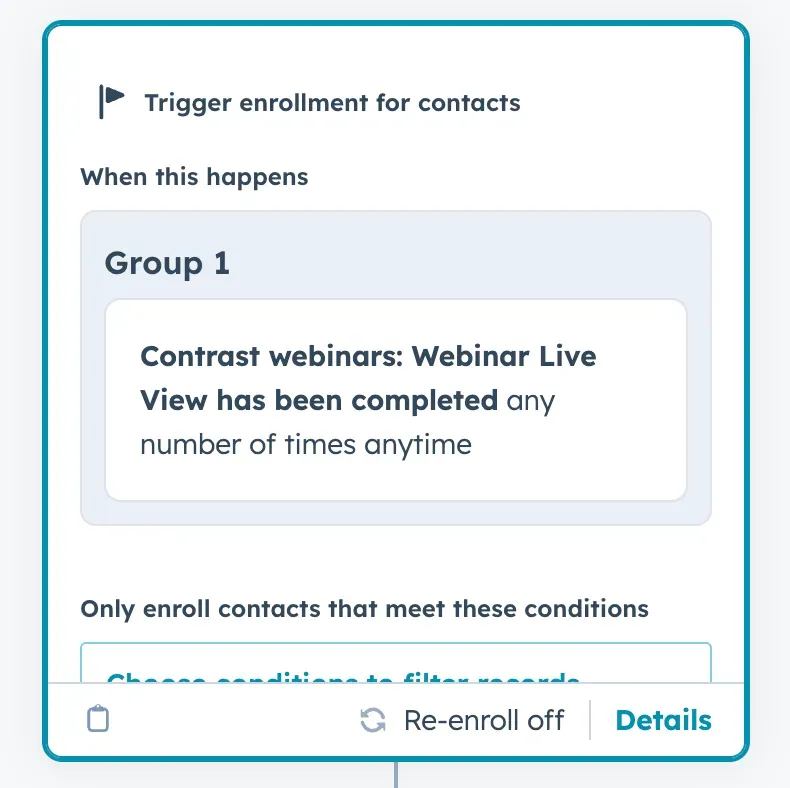
Now within your workflow we're going to create a branch. We do. this with the AND/OR logic so that for example we can filter in ICP based on different criteria – such as: Did they watch a webinar? How long? And what industry are they in (based on poll result)?
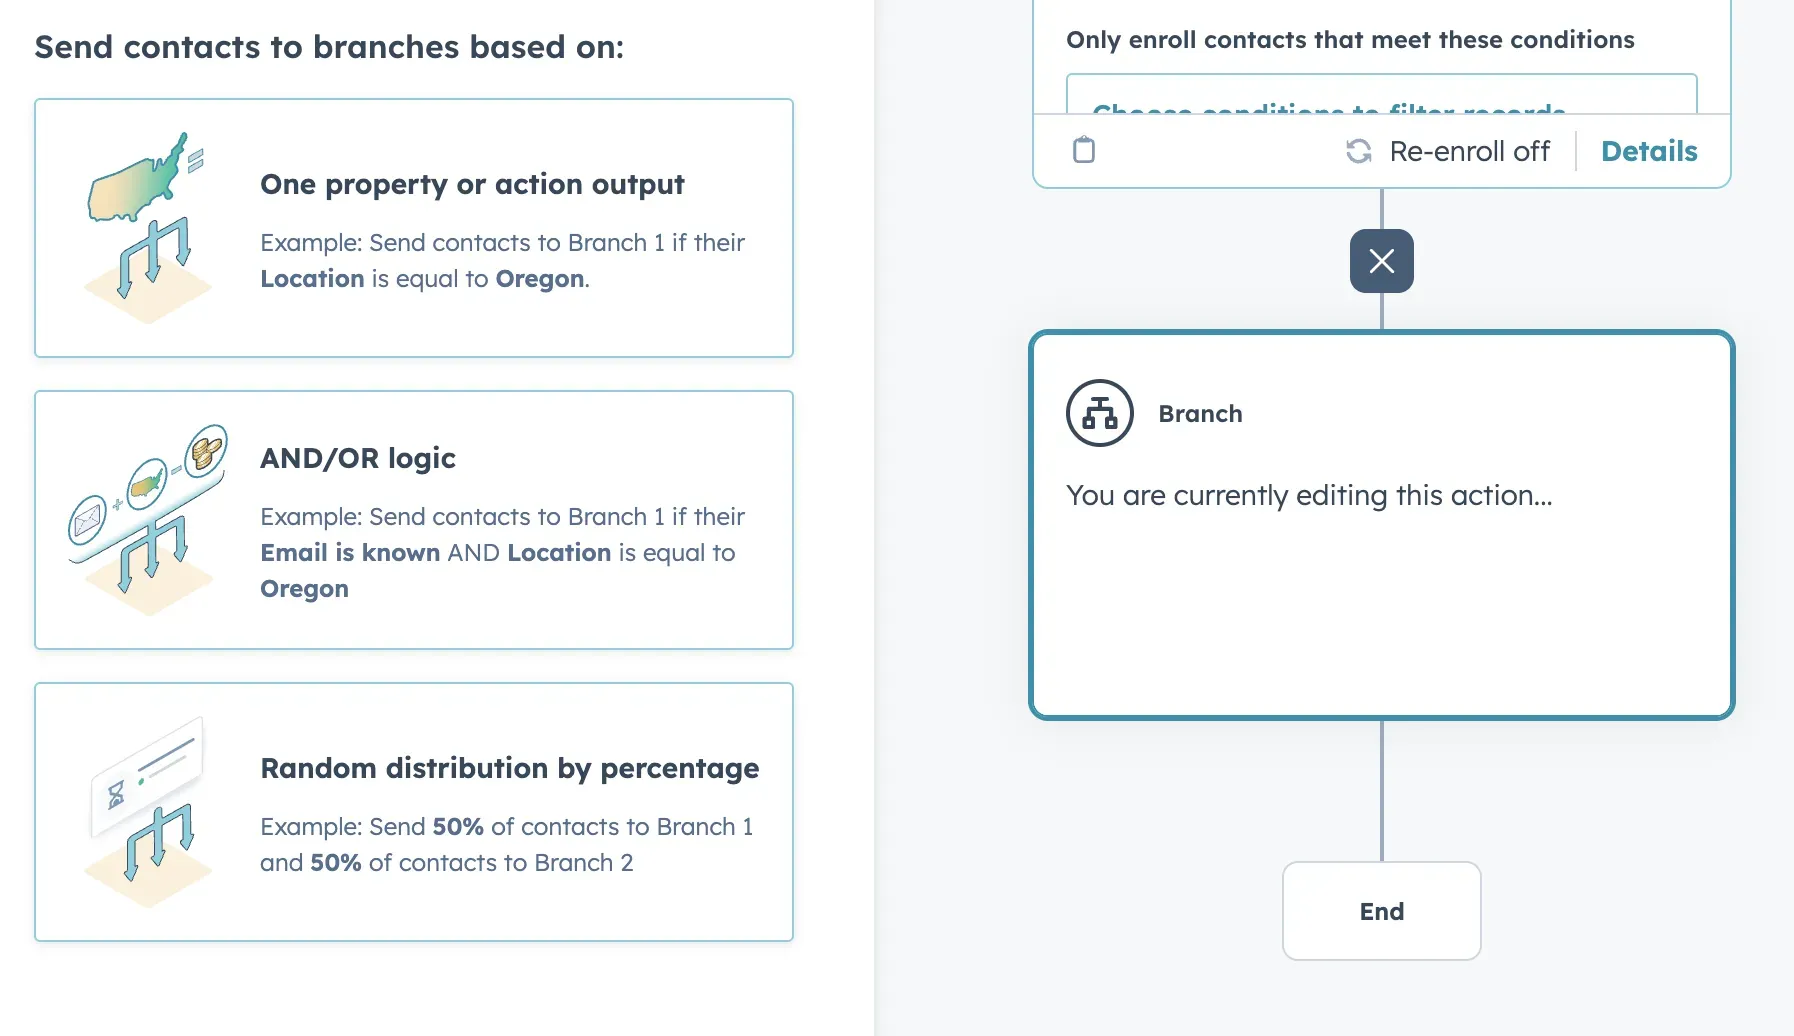
Let's again use an example here at Contrast to make things practical and use our real life criteria to show you what's possible. Logically, we start with the ICP-fit branch:
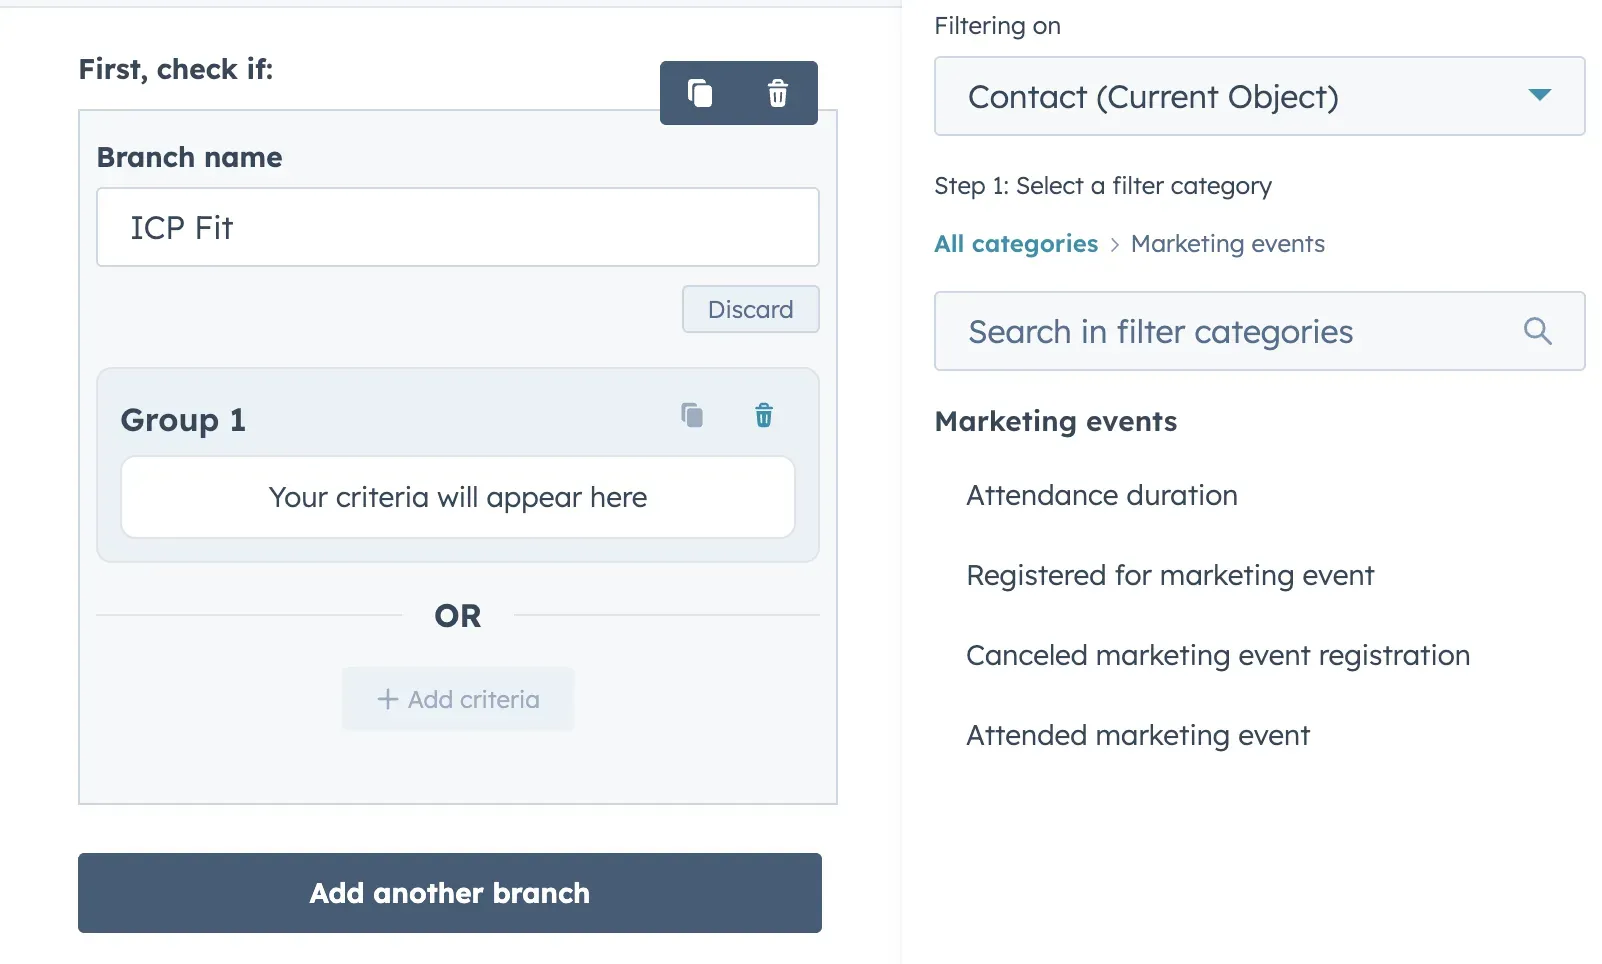
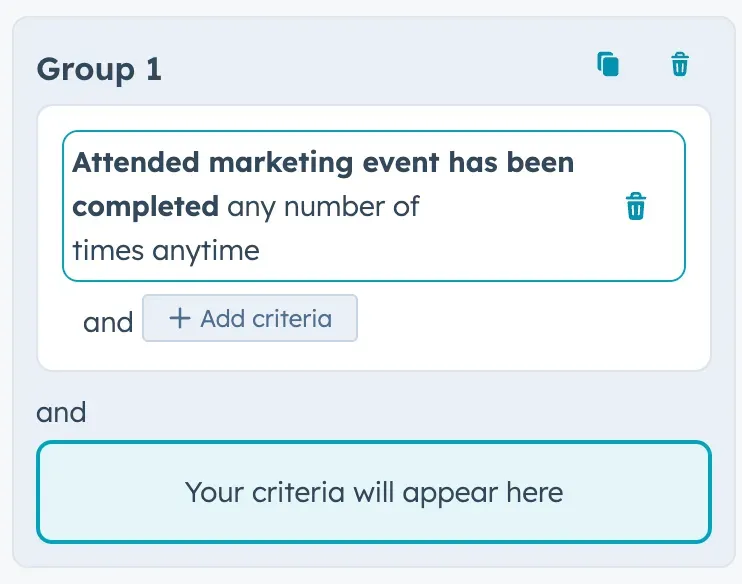
We can search in the categories for marketing events. Now let's make sure that only people who have attended a webinar fit our ICP. We're only looking for high intend prospects.
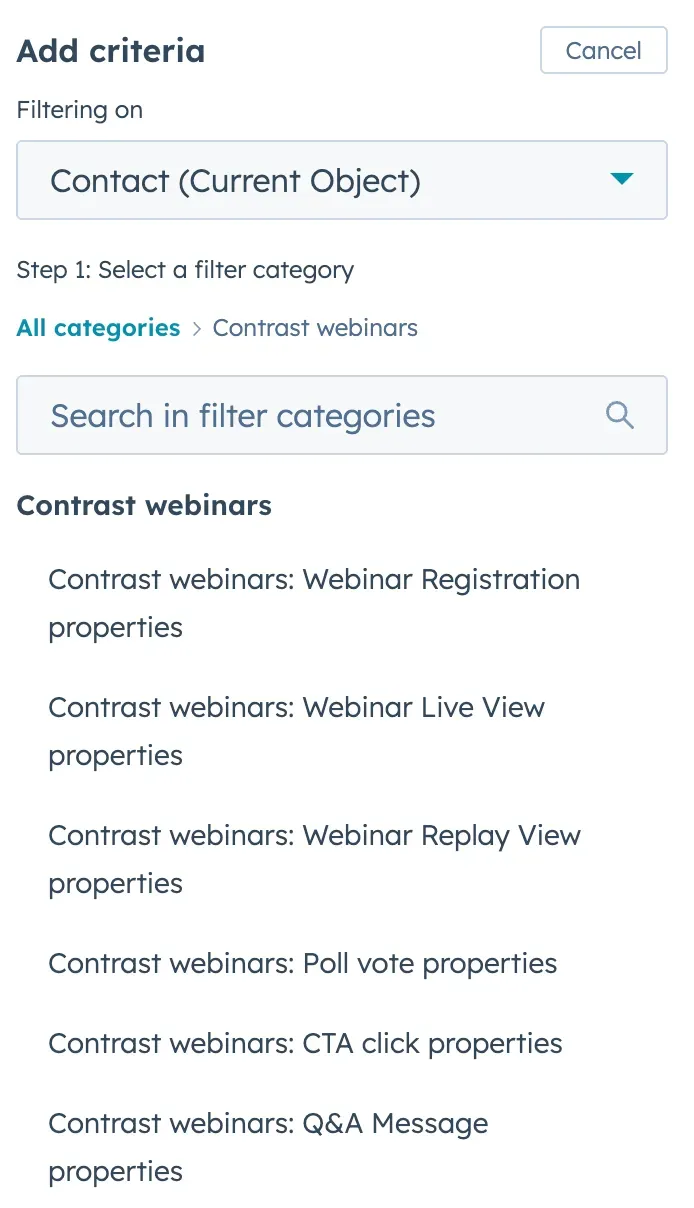
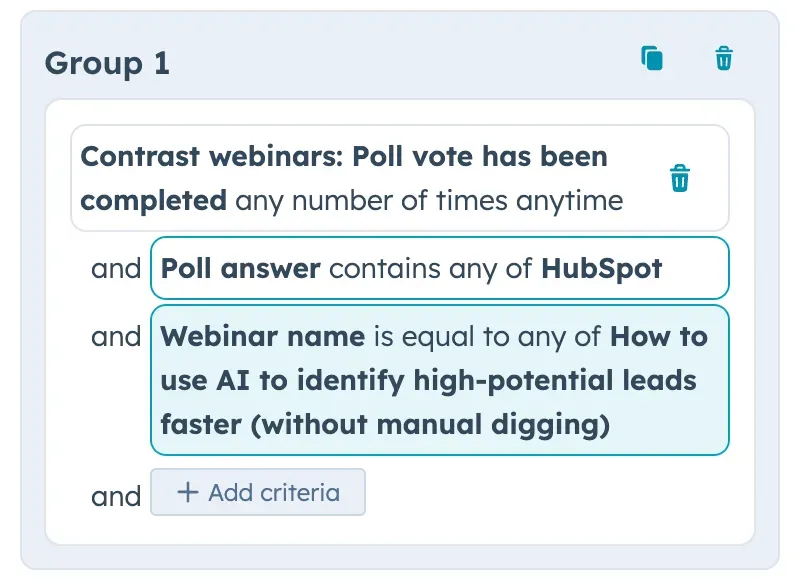
Now that we have set this up. Let's go deeper. We only want to classify HubSpot users as ICP. Remember the poll we used? Add a criteria. In categories search for "Contrast". Now click on "Contrast webinars: Poll vote properties".
Now select Poll Answer as your criteria, and set the answer to HubSpot. And that's your setup. Now for our ICP branch we want them to be set to marketing contact. Anyone else – we set them to non-marketing contacts: helping you save a few bucks.
Lead routing based on industry
You don't need to use expensive enrichment tools to get people's industry.
- Set Up Workflows for Lead Routing:
- Navigate to the "Workflows" section in HubSpot and create a new workflow.
- Choose "Contact-based" workflow to start.
- Define Enrollment Triggers:
- Set the enrollment triggers based on the poll responses. For example, if you have a poll question about industry, use the response to trigger the workflow.
- Example: If the poll response for "Industry" is "Finance," enroll the contact in the workflow.
- Branch the Workflow Based on Poll Responses:
- Use "If/Then" branches to segment contacts based on their poll responses.
- For each branch, define the criteria based on the poll response. For example:
- If "Industry" is "Finance," route to the Finance sales team.
- If "Industry" is "Healthcare," route to the Healthcare sales team.
- Assign Leads to the Appropriate Teams:
- Within each branch, use the "Rotate leads" action to assign the contact to the appropriate sales team or representative.
- Ensure that each team or representative is set up in HubSpot and available for lead assignment.
- Notify the Sales Team:
- Add an action to send an internal notification to the assigned sales representative or team. This can be an email or a Slack notification.
- Include relevant information about the lead and their poll responses to provide context.
Fully automated retargeting with Ai based on engagement
Alright. That was a cute little setup – just to get you started in the world of workflows and branching. But let's go deeper. This time we want to do 3 things:
- Decide who we will manually reach out to
- Decide who we can reach out to using Ai
- Enrol the rest in a nurture campaign
Same thing as before. New workflow and create branches using AND/OR. This time, we're adding an extra branch. We're only using data we have in the "Contrast webinars category".
People who voted on a poll and watched over 80% of the live webinar are the ones we want to pay special attention to. We put them in the manual reach out branch.
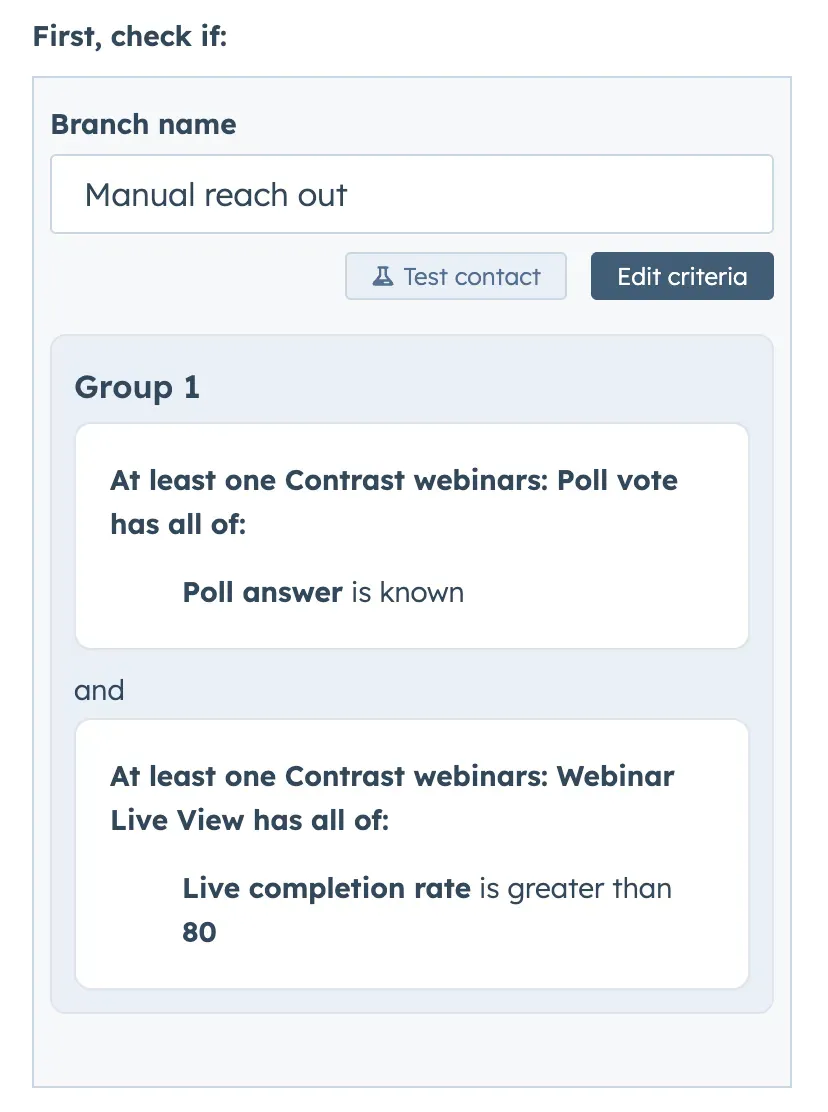
We also have a few people who voted on a poll – but who have less watch time than the first group we created. In this example that's people who watched less than 80%. But feel free to play around with these numbers until they make sense for your business.
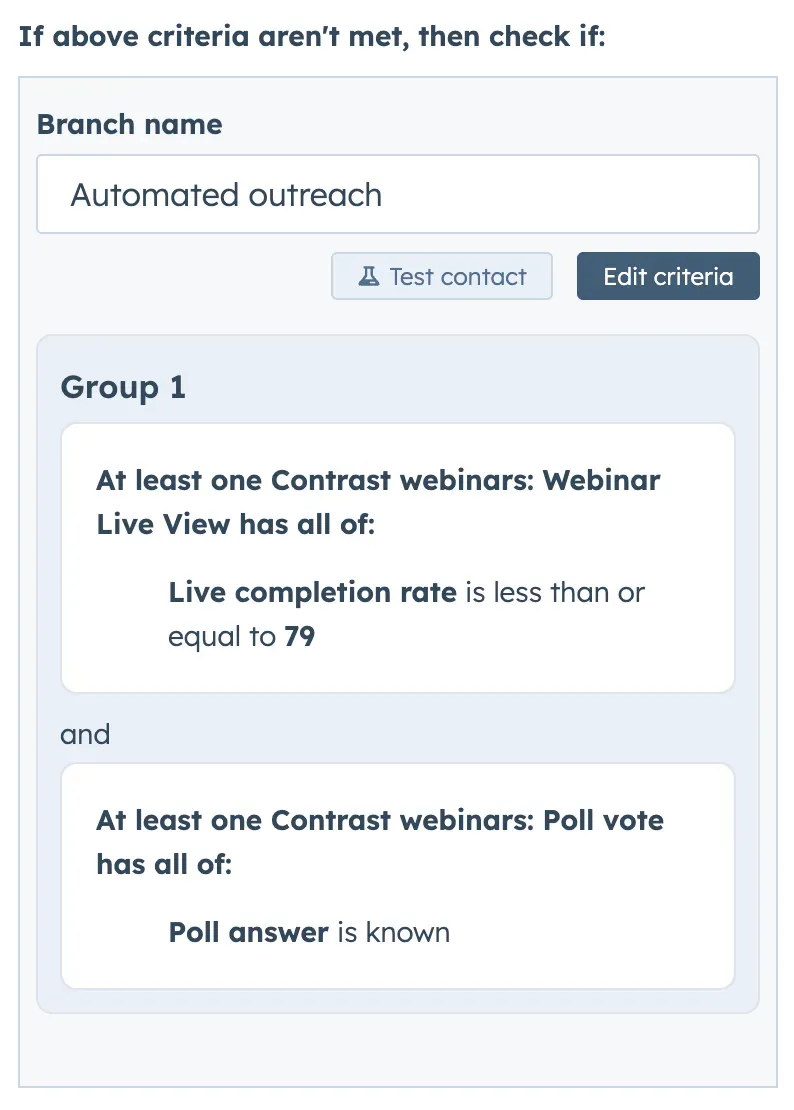
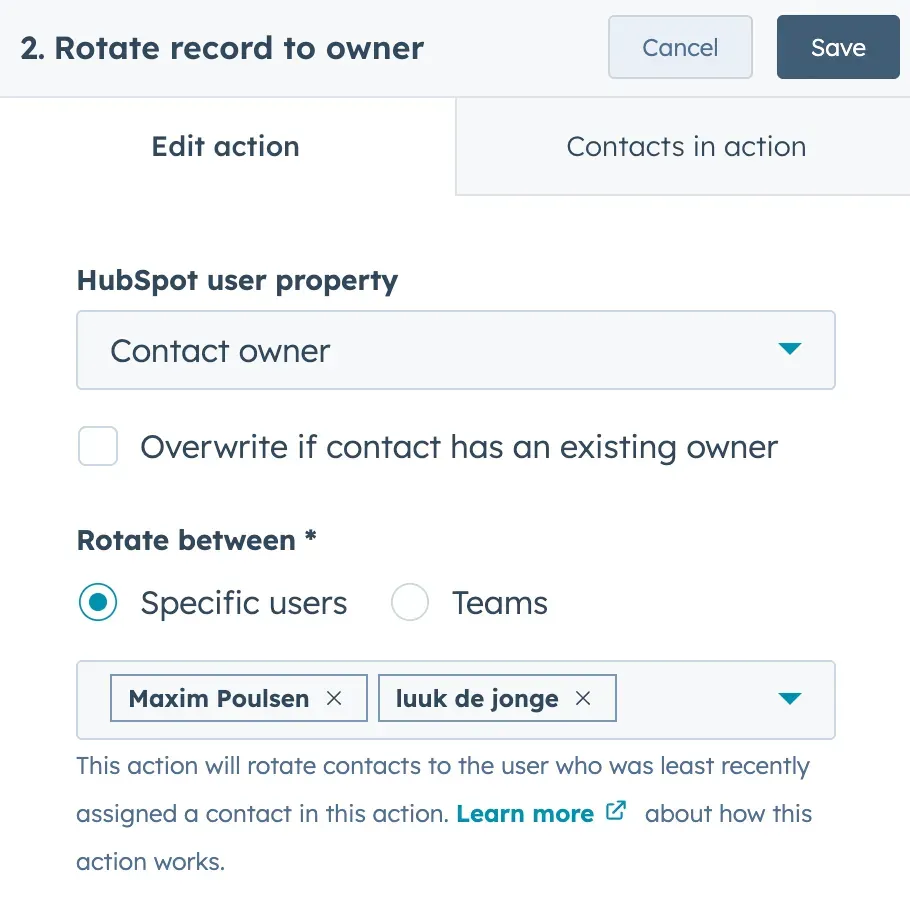
Now let's setup the actions. For our "Manual reach out" branche we can use the rotate contact owners action and set up the configuration. Now the contact owner will get a notification the minute somebody needs manual outreach.
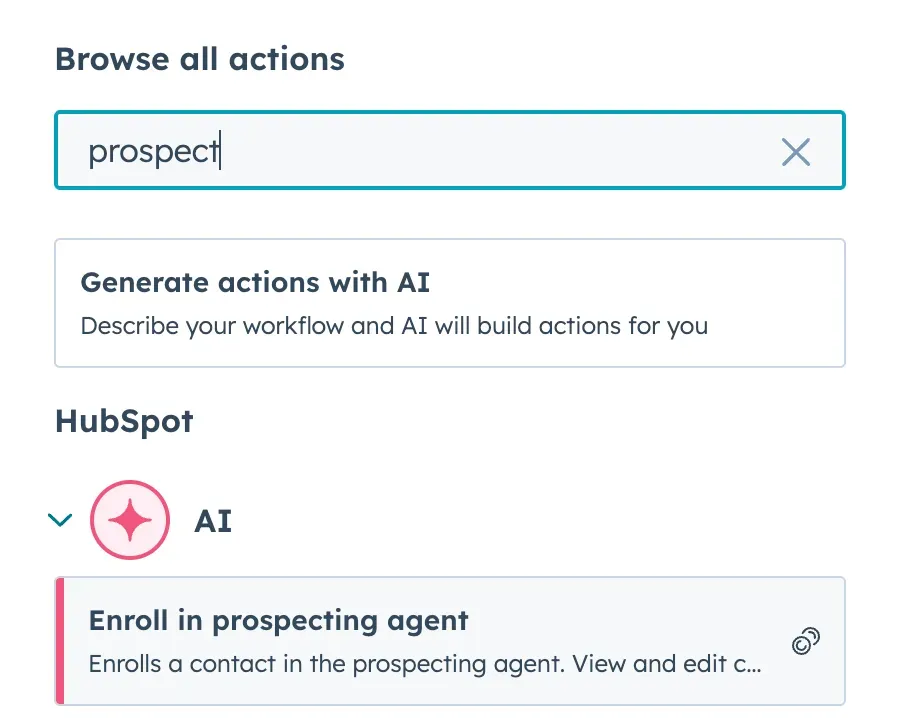
For the people who answered a poll but didn't watch the webinar in its entirety, we still want to reach out – but because of our limited sales team do this using the Ai prospecting agent (this requires you to have set up Prospecting Agent ahead of time*) from HubSpot.
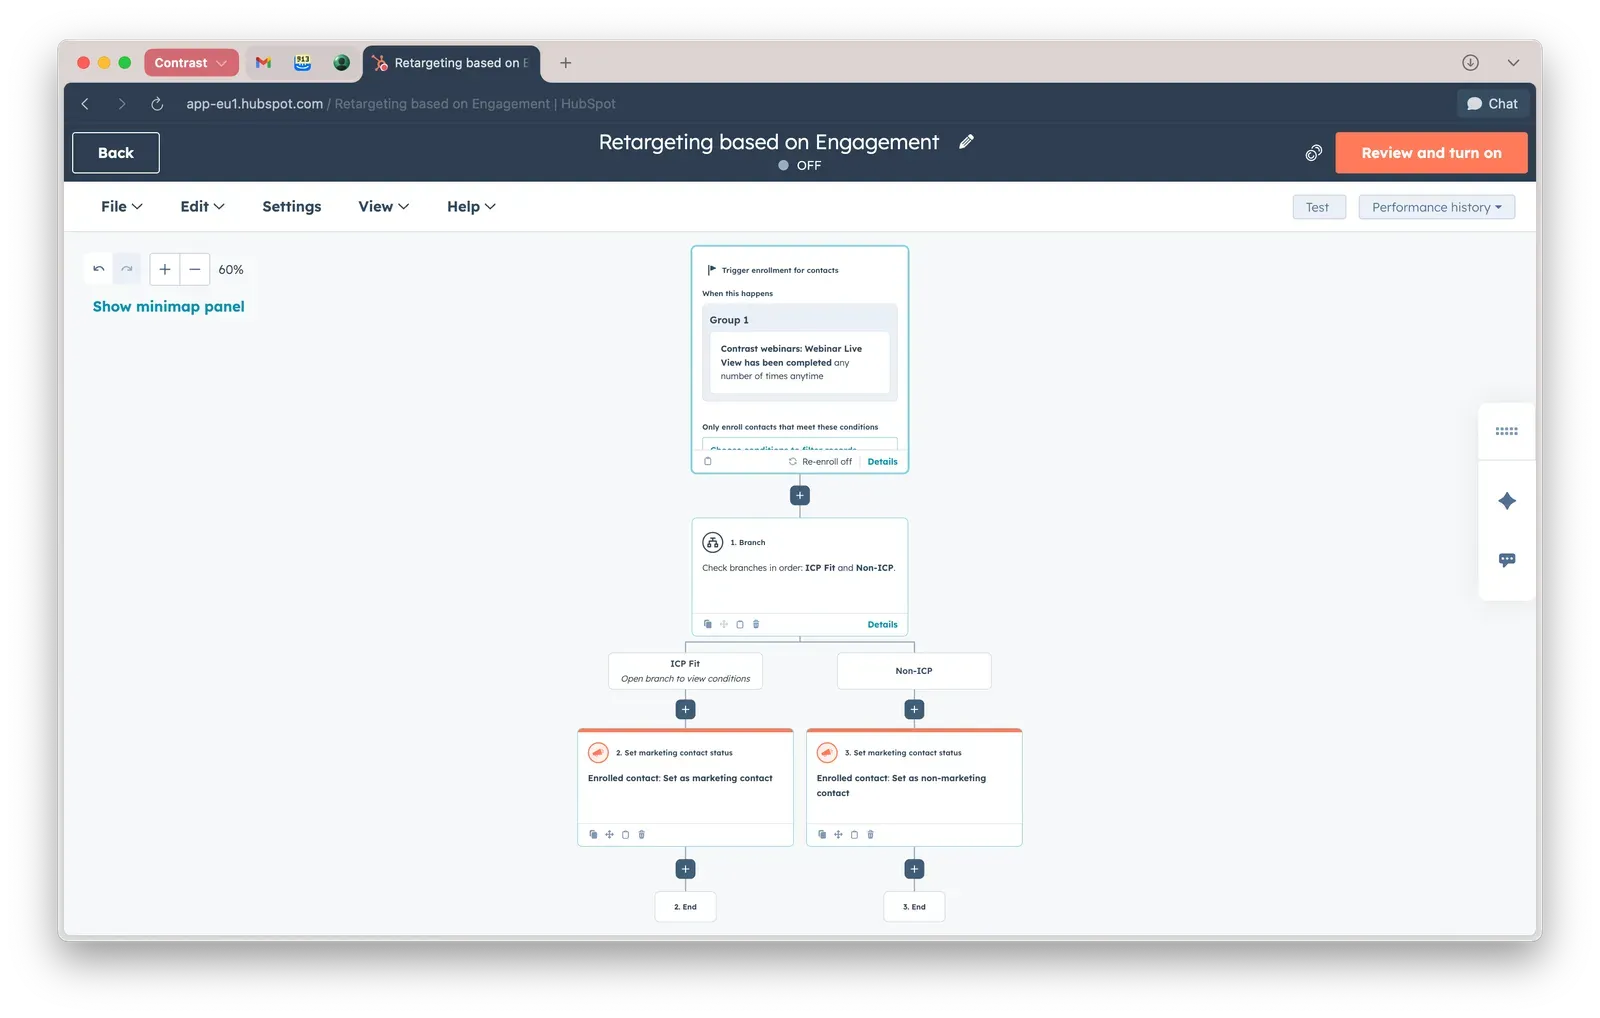
And for the people who weren't engaged, we simply enrol them in an email nurture campaign. You do this by selecting the "Send email" action and select the email(s) you want to send out. Now your branched workflow will look like this:
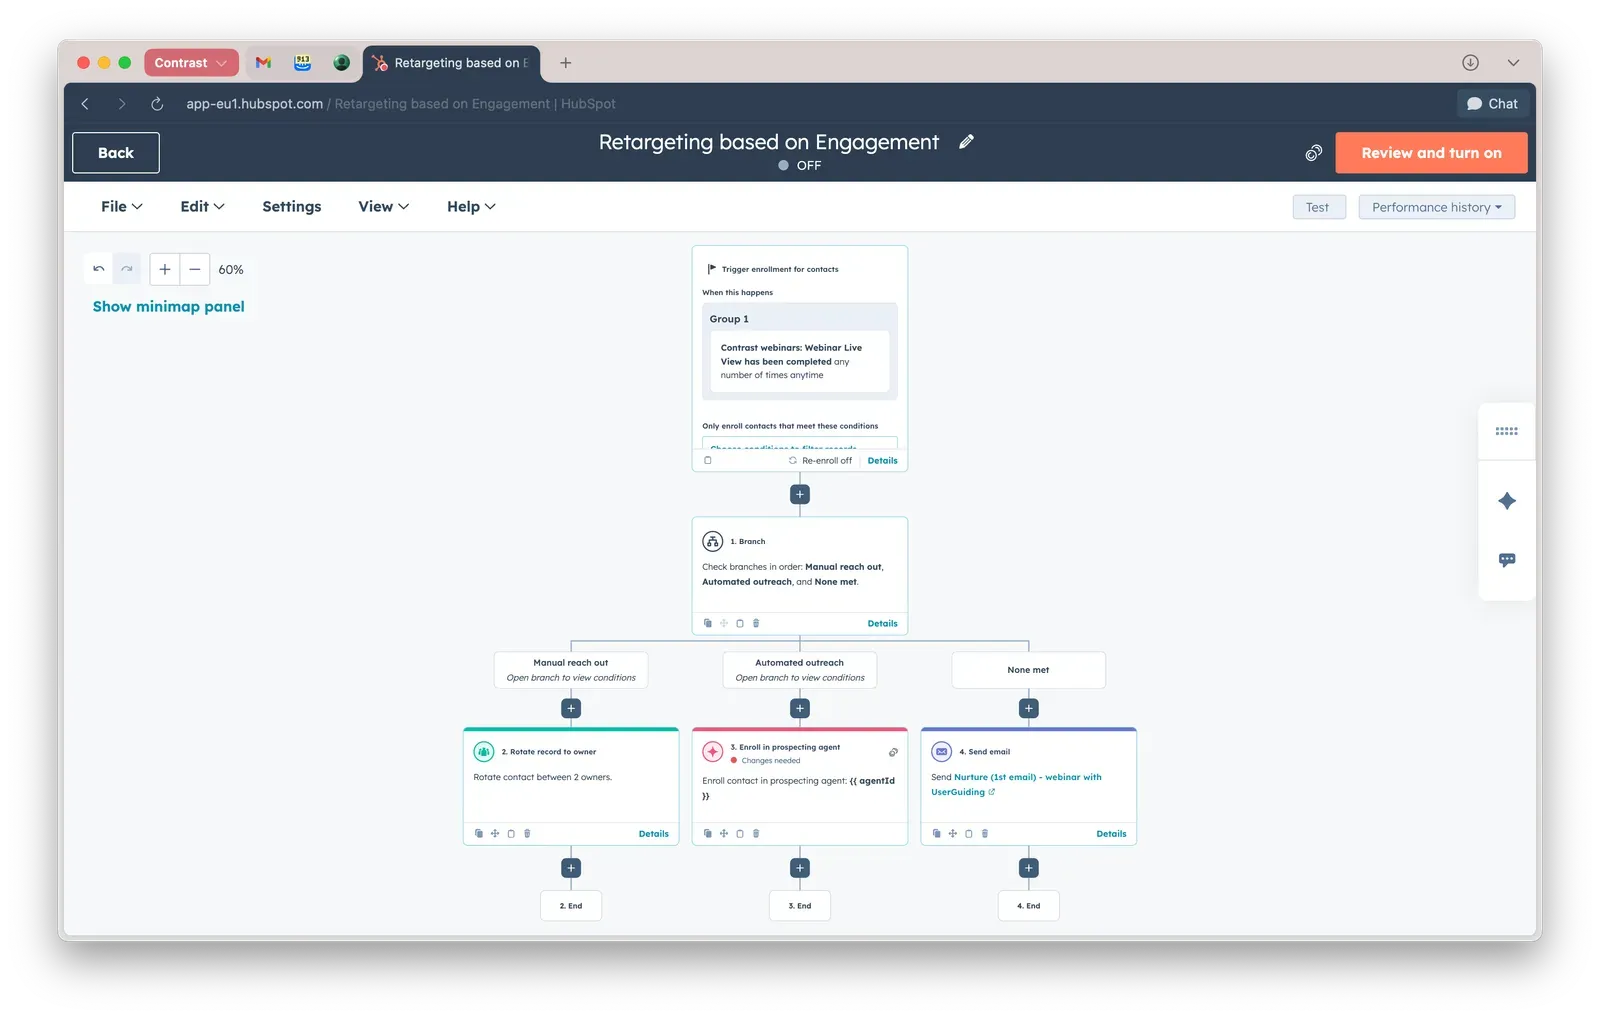
You see that this is a very powerful way of using webinar data to route leads to the right people, actions and automations. When set up correctly they will help you save loads of time – while surfacing the right prospects more effectively.
In this example, we have only scratched the surface of what's really possible. That's because we only looked at poll answers as engagement data. But don't forget – if you're using Contrast you get a lot more engagement data that you can use in order to route leads:
Advanced use cases
The two examples before give you a good idea of how to use webinar data in workflows using branches and different actions coupled to them. Now that you master this, it's time to explore some of of these advanced use cases:
For an even deeper look at how App Events — the underlying data layer behind these workflows — work in HubSpot, see our guide to automating webinars with HubSpot App Events
Lead capture and enrichment
Use Webinar registrations to create/associate contacts, stamp webinar metadata (topic, date, source, UTMs), and enrich interests. Branch immediately on firmographic fit (ICP tiers, industry, company size) plus intent signals from CTA clicks and poll votes:
- Strong fit + CTA “Request demo”: create a deal, assign owner, start a fast-track sequence.
- Weak fit + high engagement (multiple live/replay views + poll): enter product-led nurture.
- No fit + low engagement: minimal-touch newsletter track.
Sales handoff playbooks
Convert intent into immediate sales actions:
- If CTA click = “Request demo” or “Pricing” and viewed live: create deal in “Discovery,” add webinar note (topic + time-in-session), attach Q&A transcript snippet, assign owner by territory, set task due.
- If Q&A message mentions urgency or budget keywords: escalate with high-priority task and add custom property “Buying signal: Yes.”
- If multiple replay views within 7 days: branch to “hot follow-up,” send owner an email with talking points derived from polls/Q&A.
Precision nurture and content routing
Let behaviors choose the next touch automatically:
- Watched live but no CTA: send “Moment-based recap” with key clips; branch on poll vote to tailored content (e.g., voted “AI use cases” → AI case study).
- Registered but no views: 3-step recovery cadence (short clip, social proof, objection-handling blog).
- Replay viewers only: repurpose highlights and invite to the next related webinar; if second replay occurs, test a light-touch trial offer.
ABM and account-level orchestration
Aggregate engagement at the company level:
- If 3+ contacts from the same domain show live/replay views, branch to “Account warming”: ABM ads, owner sends multi-stakeholder recap, invite to private roundtable.
- If target account shows poll votes favoring a product module: trigger a vertical one-pager follow-up.
- If executive title clicked “Pricing”: create deal and executive-focused outreach play.
Customer and expansion plays
- Existing customers who attended: CSM notified; if poll indicates interest in add-on → expansion playbook.
- Q&A messages that are feature requests → push to PM backlog and send roadmap follow-up; branch if multiple customers asked similar → invite to beta webinar.
Partner and community workflows
- CTA click “Become a partner”: partner intake workflow, assign partner manager, send co-marketing kit.
- High engagement but not ready to buy: branch to community invites (Slack group, office hours), track ongoing webinar attendance for future re-qualification.
Reporting and ROI loops
- Attribute pipeline created from CTA clicks and high-score branches; compare conversion by Live vs Replay cohorts.
- Build dashboards for score distribution, time-to-first-touch, and deal velocity from webinar-sourced contacts.
- Close-loop logic: if nurture → CTA within 30 days, back-credit the original webinar for influence; branch to “multi-touch success” reporting.
How to Create a Webinar Influenced Dashboard in HubSpot
You know. I know it. All of this is cool – but without proper reporting we still don't know if it's actually working, or not. Let's look at how you build reporting dashboards you can use to show your boss you're up for that promotion.

View Revenue per Webinar using Marketing Events
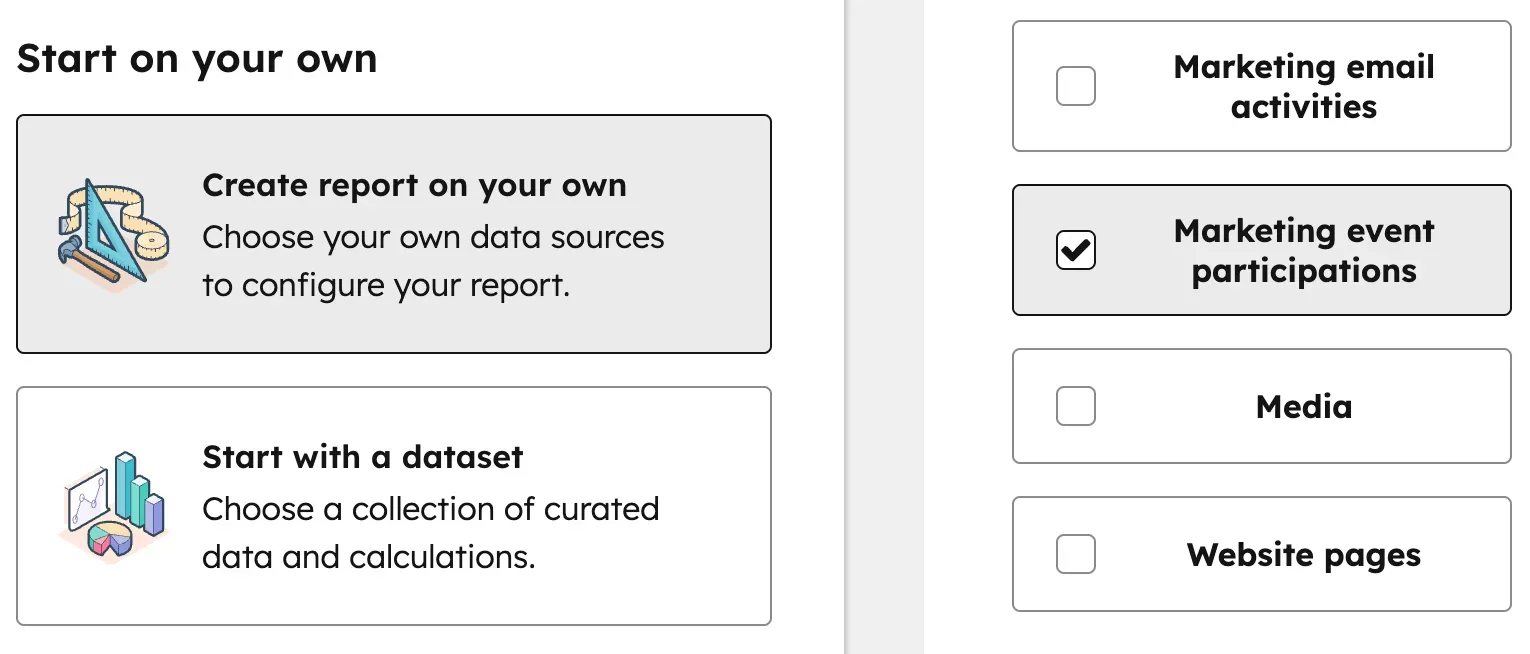
Start by creating a new report, a custom report in this case. Our primary data source are contacts. Allow more data sources by toggling the option. Now read the following block and follow the exact sequence:
1. Contacts (primary data source)
2. Marketing event participations
3. Marketing events
4. Deals
Literally follow the sequence by clicking one after the other and add them to your report builder
Now scroll to, or type in "Marketing Event Participations". Make sure to include participations. Without it – it doesn't work. We found out the hard way. Now click on Marketing events. Finally, click on Deals. This is your foundation.
- Take the "Name" (from "Marketing Events") on the X-axis.
- On Y-axis add the (SUM) Amount in Company Currency (from "Deals)"
- Now let's set the filters. Filter in "Is closed won" from Deals in. Set it to True.
- And finally make sure webinar name (from "Marketing Events") is "Known" to only focus on webinars.
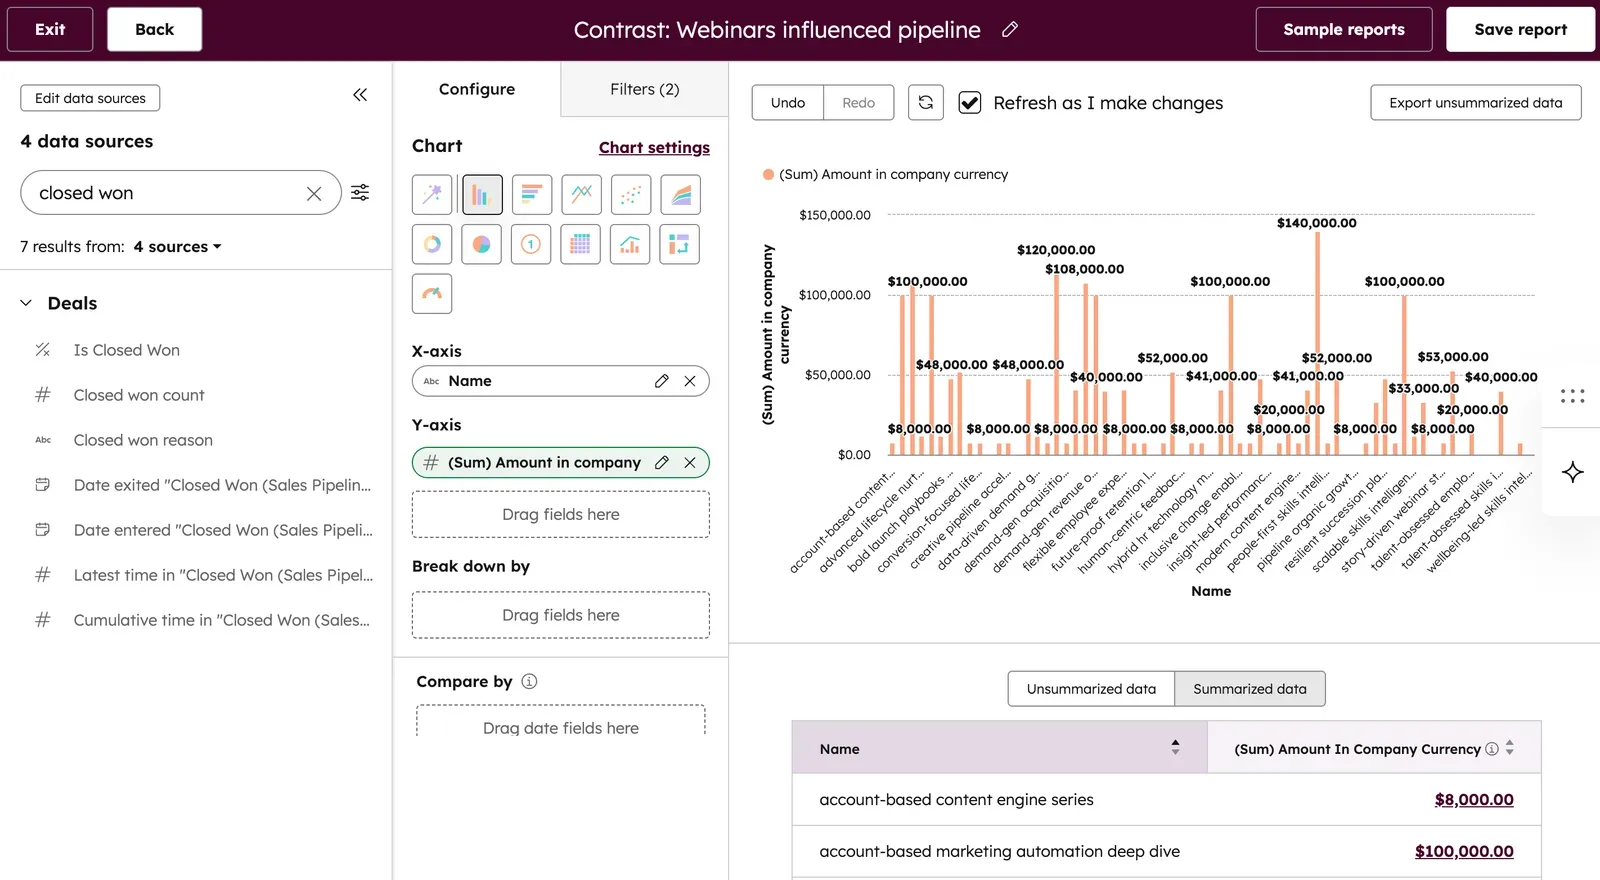
This graph now shows every webinar you have hosted, and the revenue that is attached to it. HubSpot attaches revenue to a webinar when one or more contacts are linked to a closed won deal.
View how webinars influence different deal stages
By filtering in Deal Stage (from "Deals") you can now split this data up by their deal stage. Don't forget to filter out "Closed Won".
For example, view the pipeline influenced by webinars over time. You might want to throw in another webinar if this is low compared to others months.

View monthly registrations with Marketing Events
This one is pretty simple. Follow the exact same steps as before by starting with contacts as the primary data source and ending with deals.
- On the Y-axis we add the Count of contacts (from "Marketing Events").
- Now on the X-axis we add Occurred at - Monthly (from "Marketing Events Participation").
- Now for the filter, let's make sure we only have contact generated through Marketing Events: set Marketing Events Name to "Is Known".
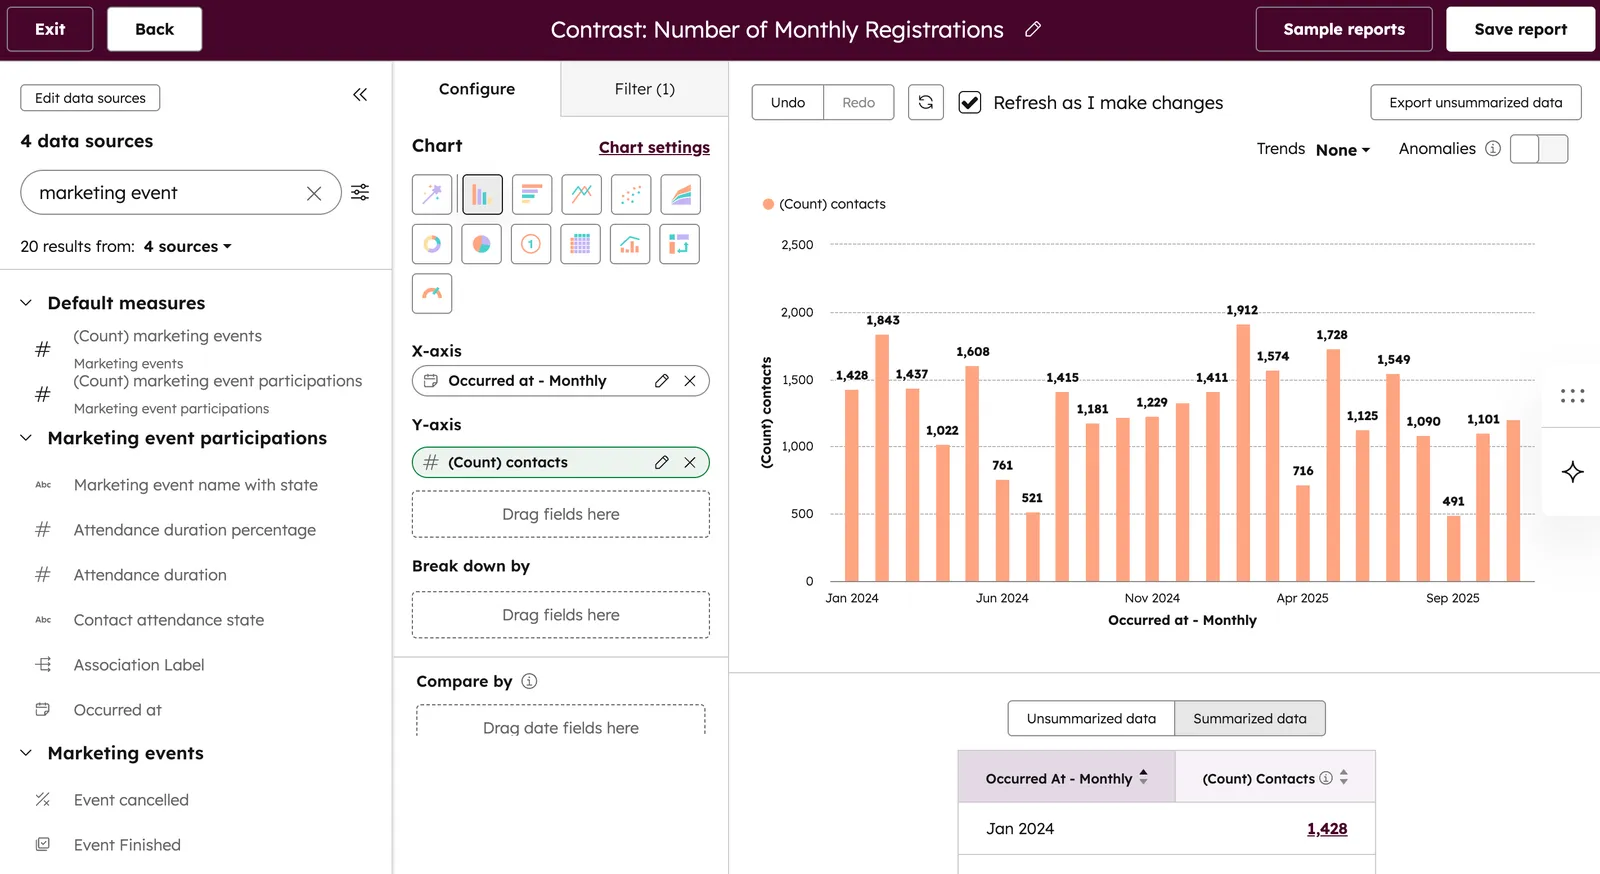
Just by following these steps you'll have a report that shows the revenue influenced by every webinar you have run.
Other ideas:
- Measure how many replays views
- Aggregate on deal level
- Influence of CTA clicks or Poll answers
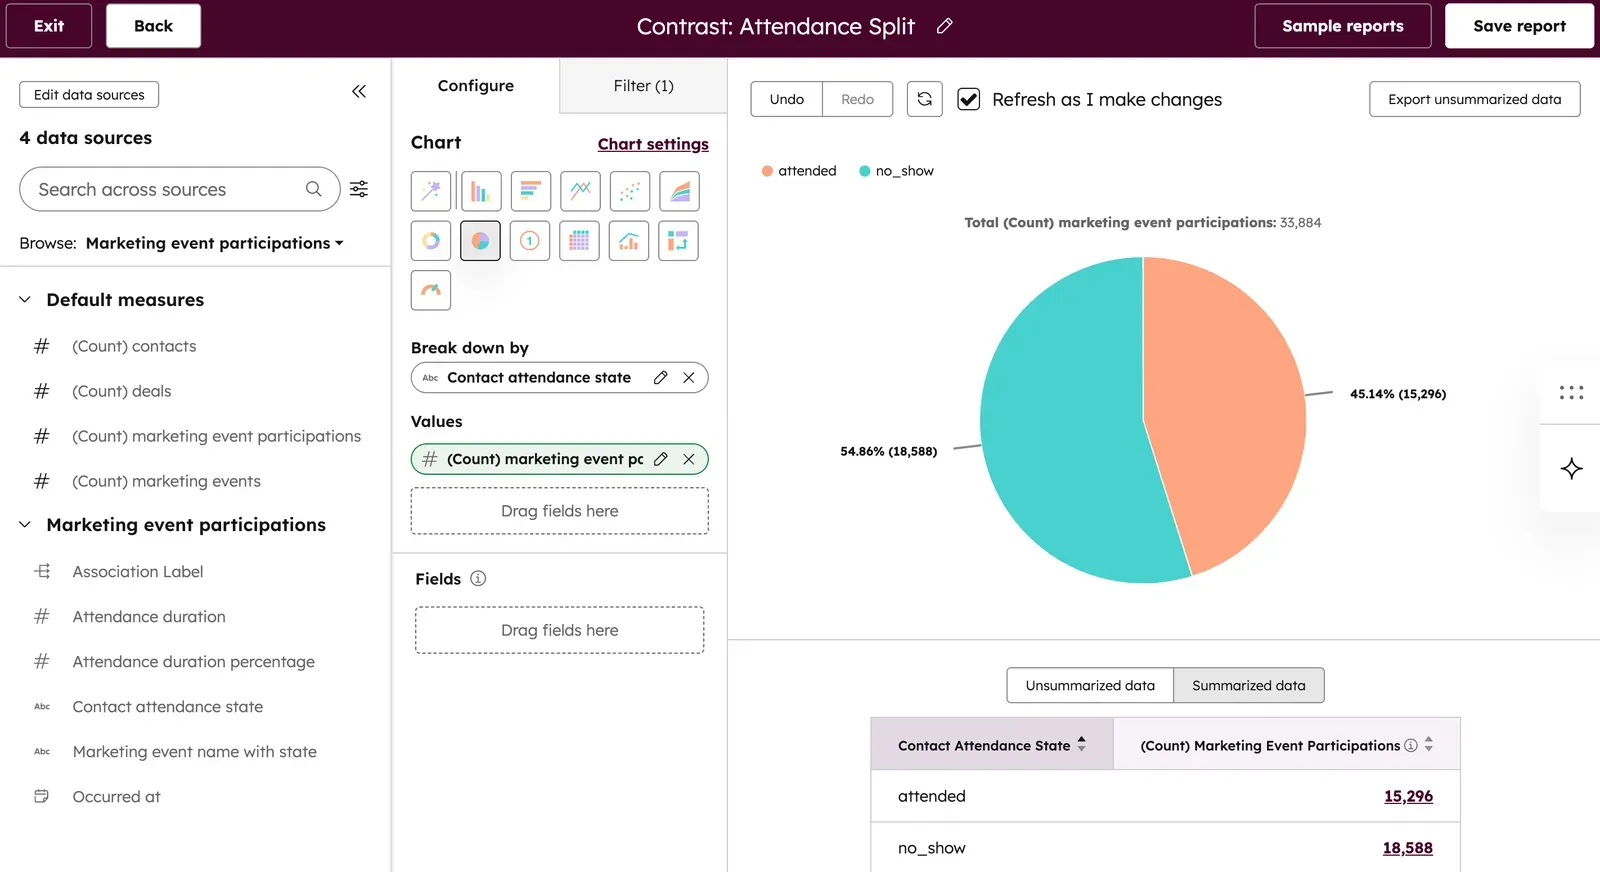
Attendance split
Check out how many of your registrants actually show up to your events and webinars by creating this attendance split. It's smart to track this over time so that you understand whether your event strategy is still resonating with your audience.
- Select a pie chart
- Set values to (Count) Marketing Event Participation
- Break down by Contact attendance state
Notify contact owners about engagement on Slack or Teams
You can use webinar engagement like live attendance, or replay views to notify the contact owner on Slack or Teams a message. Because these properties are increments, you could for example use the property Contrast Live Views and use that in a workflow to create a trigger when someone has watched 3 live webinars. Or perhaps 5 replays.
And remember? Act when the lead is hot. That means we can notify the contact owner directly where work happens: in Slack or Teams.
Of course if you're using Contrast – you could also use engagement like when they answer a poll. You could even trigger the alert if they give a specific answer to a poll. Like we showed before, at Contrast we automatically surface the people who answer HubSpot to be their CRM. Because we know HubSpot users LOVE Contrast. Easy.
Alternatively, you can do this at the company level. Inside this company over 10 people watched more than 2 webinars. Signal. Notify.
Let's see how things are set up in HubSpot.
Try the #1 HubSpot Webinar Integration
Start for free with up to 50 registrants. No credit card needed.
Start for freeNotify Contact owner about webinar views
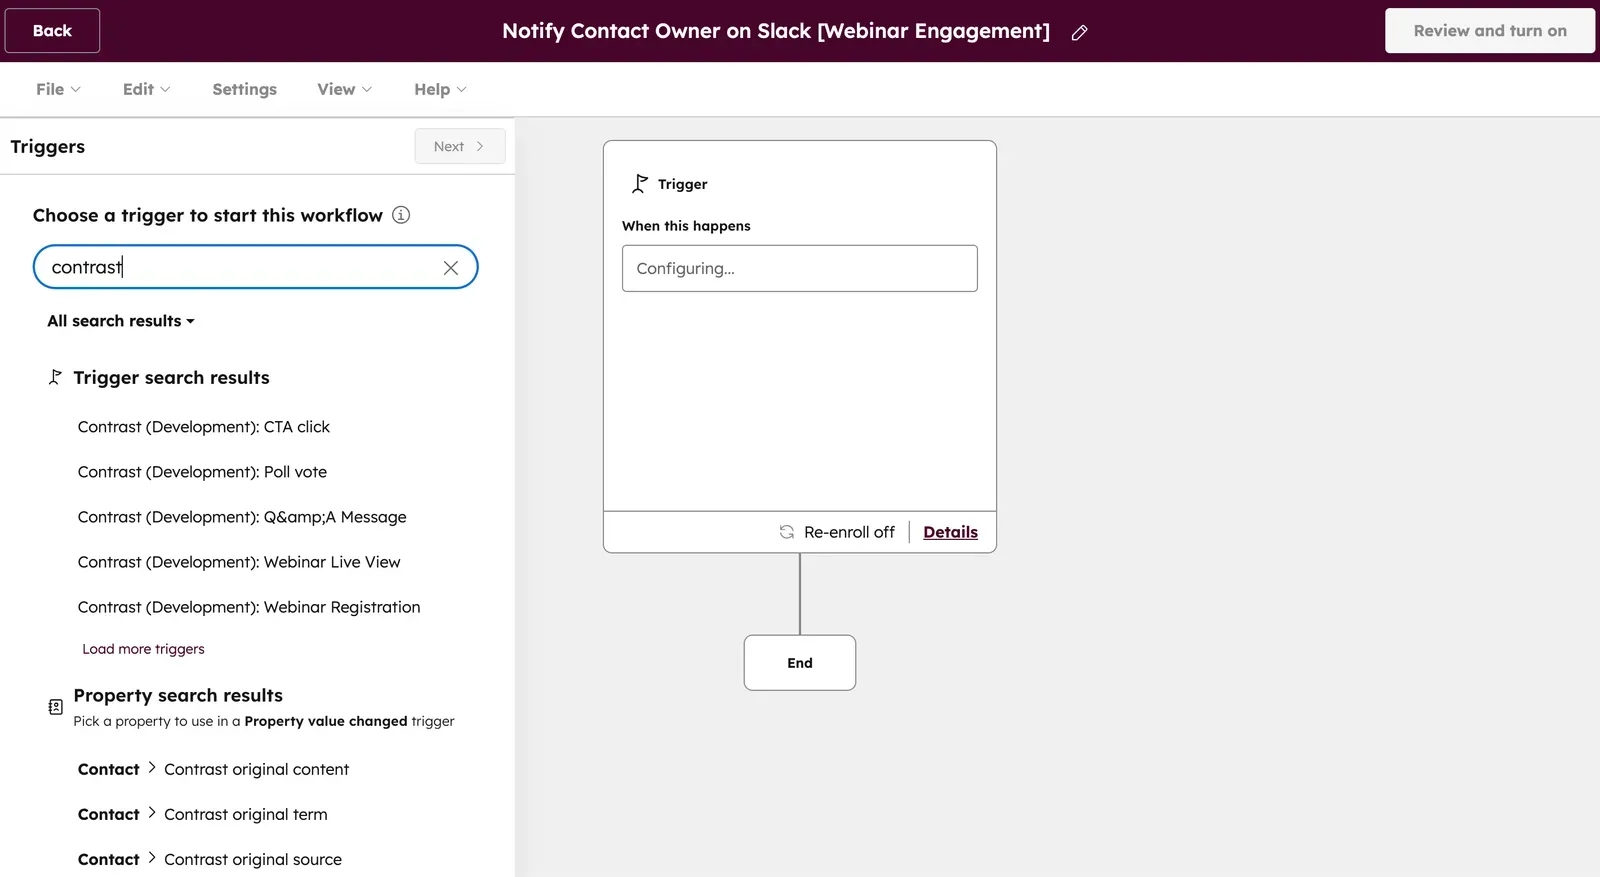
Let's start with the basics and that is to notify the contact owner of webinar views. We start by creating a new workflow. In workflows we typically like to have one workflow per use case, so it's easier to debug when we need to.
Now as the trigger, we search for our webinar platform. In this case, it's of course Contrast. Now you'll see the available triggers that you can use. This will depend on the webinar platform you have connected to HubSpot. Click on "Webinar Live View".
This trigger will notify contact owners of every live view that happens. But perhaps that's too loose – and we want to add different criteria. How about when the person has watched more than 50% of the live webinar? We can do this by simply adding our filtering criteria.
Now let's notify the contact owner on our communication tool of choice. For us at Contrast, that's Slack. Make sure that you have the integration installed before setting this up, otherwise it won't work.
Now search for Slack in the action menu. You will see the action "Send Slack notification" appear. Select this.
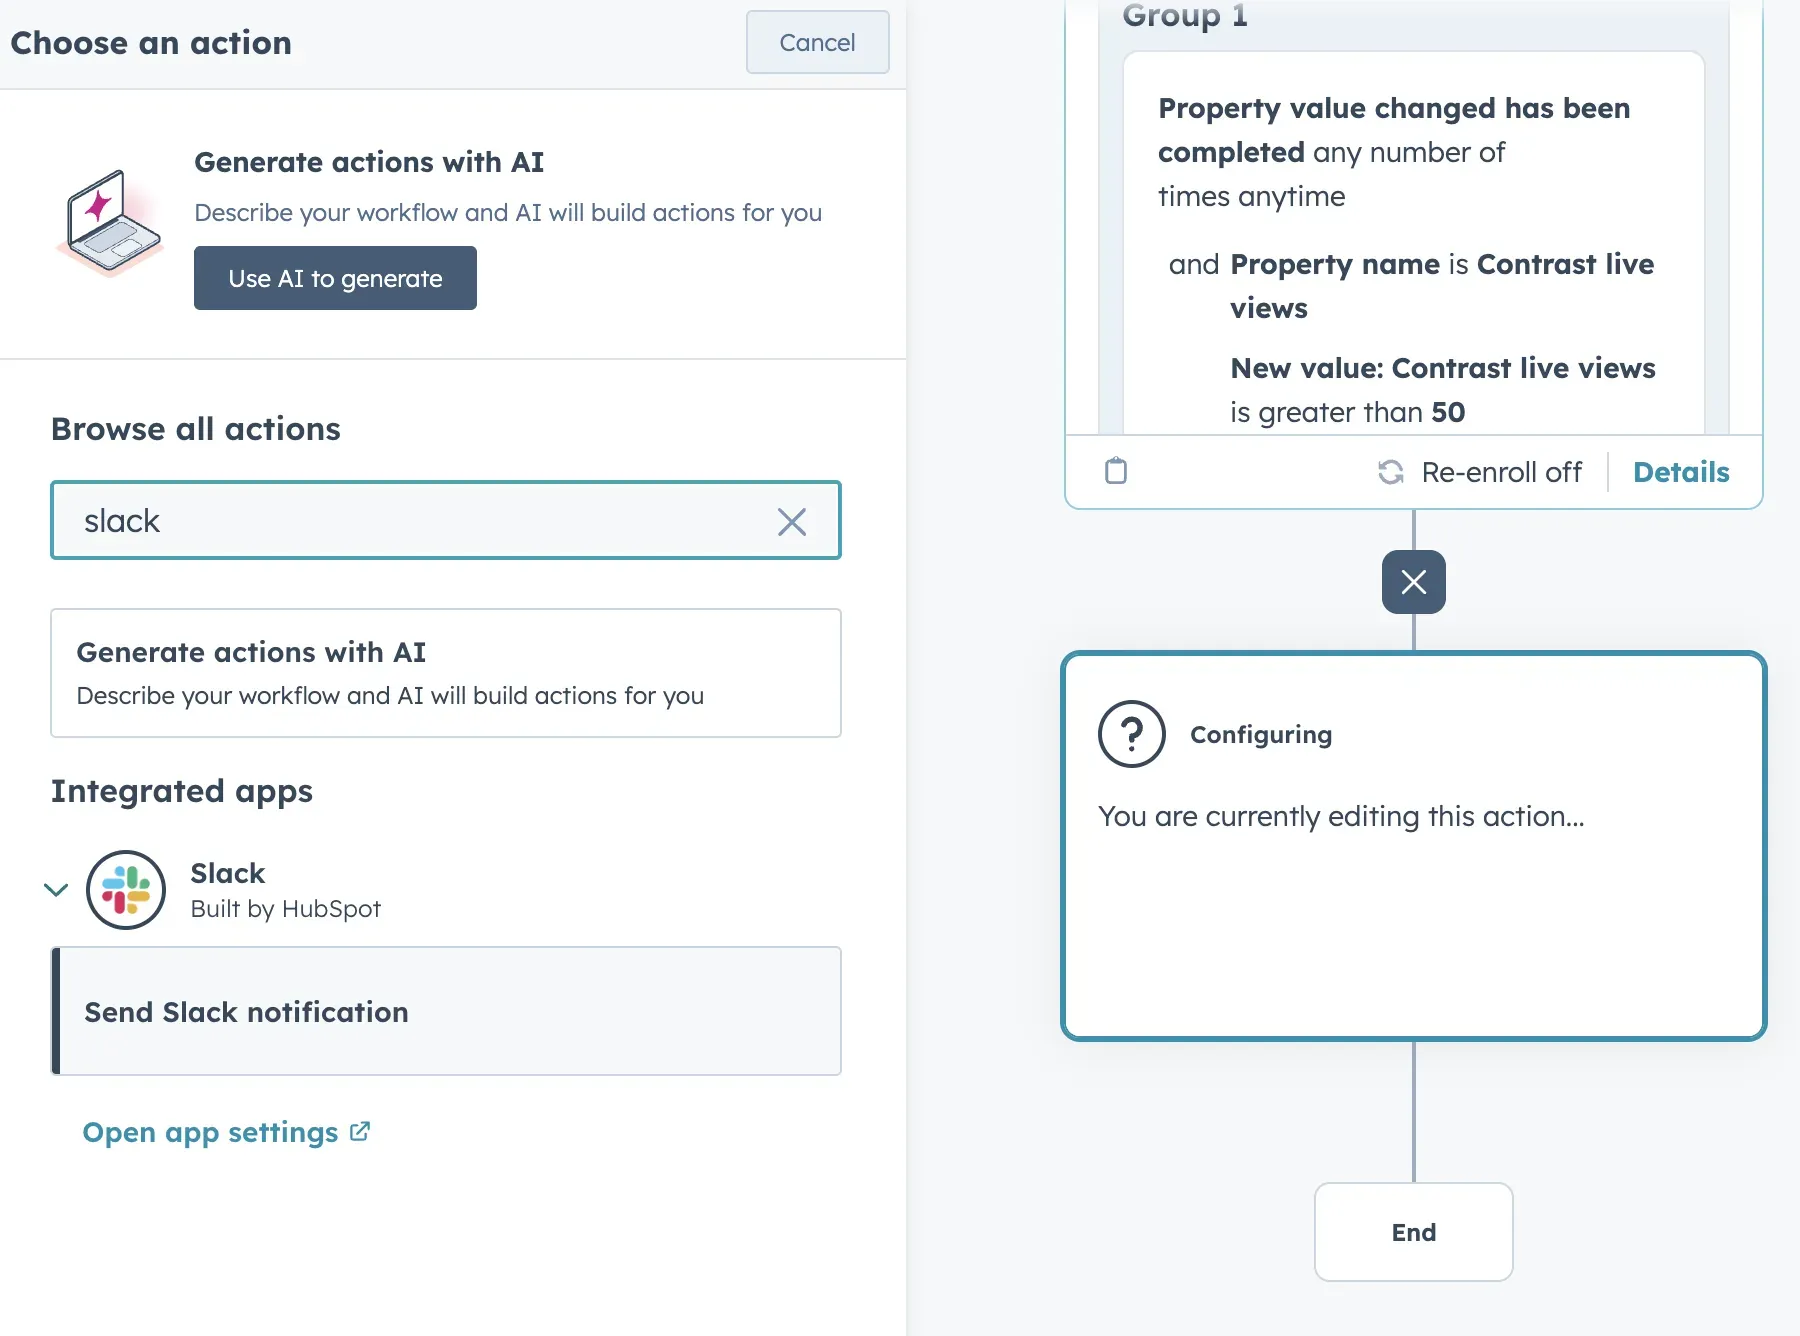
Now you need to set up who and how you'll notify them. Slack is pretty flexible here and you can either go the DM route or in a generic channel such as #sales (using Send notification to channels).
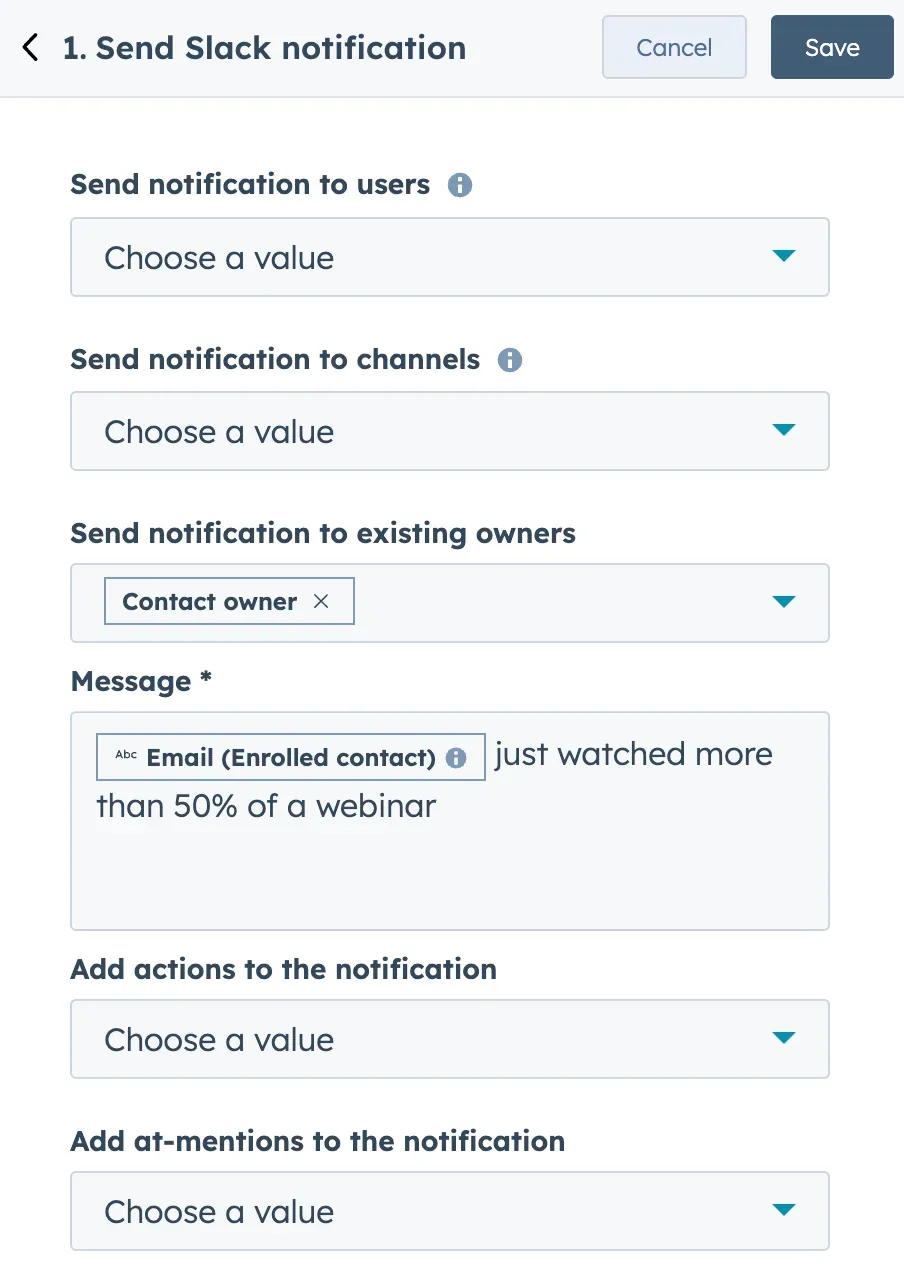
In our example we want to notify the already existing contact owner on Slack that their prospect has watched 50% or more of a webinar. See here the setup for that. We of course encourage you to play around with this setup and customize it to your use case.
The example above uses Slack. Microsoft Teams also has an integration that you can install here. Save the action and now turn your workflow on.
Notify Contact owner about poll answers
We can do the exact same with more rich engagement info such as poll answers. At Contrast, we usually ask people "What's your CRM?" to qualify our audience. We know we score well with HubSpot. So besides scoring the lead higher, we can also let their contact owner know about this on Slack.
Create a new workflow and again search for Contrast to find the available triggers. Now select "Contrast webinars: Poll vote" as the your trigger. Theoretically if you now activate this as your trigger; anyone who votes on a poll will trigger a notification. That's maybe a little too much.
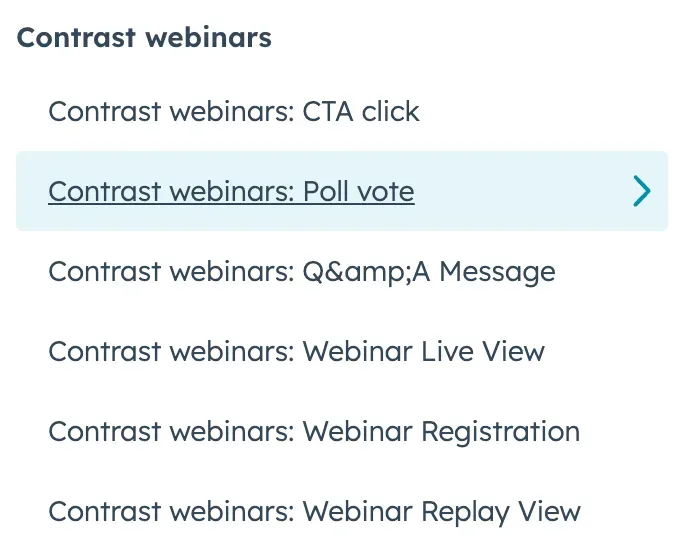
Let's filter in and only notify when the attendee answers something specific. Go into the criteria and search for Poll answer. In here you can set up the answer you're looking. Keep in mind this is case sensitive.
We recommend to put a little process in place that normalizes these values across events so the workflow simply always works. Better to frontload this than to spend 20 minutes figuring out why your workflow isn't working the way you want it to.
If you don't want to put workflows in place for all your events, you can of course put a filter in place that only applies to a specific webinar. You can do this by adding a filter criteria using the webinar name.
Now follow the same steps as before. Choose "Send notification on Slack" from the Slack integration, choose who need to get notified and turn your workflow on.
Notify Contact owner about other engagement
You can apply the same logic to either CTA clicks or Q&A messages. Let's say you have a CTA during your webinar to book a demo. You get notified that this person has clicked on your CTA. You check your demos: no demo booked from this person. Now you can reach out to this person to try and understand what has happened in between there – and convince them to book a demo.
How to use Webinar and Event Data to Personalize Outreach
If you followed along, you have set everything up to turn that webinar attendee in a demo booked. Or whatever conversion you're tracking. Likely, it's also not your job anymore – but sales. And you want to minimize the time you need to spend with them in your webinar platform, or worse CSVs, to get them the data they need to do their follow-up and be successful.
In this webinar, you shared and agreed unanimously: turning webinar attendees into revenue is your biggest challenge. So let's tackle it.
Contrast Engagement Timeline
Contrast Engagement Timeline
Sales people want one thing and that's to close leads as fast as possible. They don't have time to dig in 69 different lists with attendees, poll answers etc.. Nor do YOU have the time to help them dig up this data.
So what do we do? If you have followed this guide, by now you have set everything up correctly so that highly engaged leads automatically come to the surface. Your sales team now only needs to reel them in.
Engagement Timeline is a card on top of a contact that shows all of their engagement during every webinar on Contrast:
- Did they attend? If so, how long did they watch? Was it live, or replay?
- What did they say in chat?
- What polls did they answer? What were their answers?
- What were their questions?
- What CTAs did they click?
All of this is an absolute GOLDMINE of data that your sales team will THANK YOU for. All they have to do is sit back – relax wait for your lead scoring and workflows do their work and then start engaging.
You can now simply click on a contact and see every webinar they ever watched. Was it on replay, or live? And how long did they watch. Double click to check their engagement, such as chat messages – poll answers and even the questions they asked.
Now turning that data into a personalized message becomes a breeze, with Breeze (lol!).
How Webinar Data Personalizes Prospect Messaging
Use the signals they gave you. Keep messages short. Deliver one useful asset. Offer one next step.
Live vs on-demand and watch time
- High watch time (live): Treat as intent. Reference the chapter they reached. Example: “You reached the demo chapter on event-based scoring. Here is the setup doc we used with Acme SaaS. Want a 15-minute walkthrough of your current rules?”
- Low watch time (live): Keep it light. Send a compressed recap and one clip. Example: “You caught the intro. Here is a 3-minute clip on integrations. If helpful, I can map this to your stack.”
- On-demand: Lead with flexible resources. Example: “Since you watched on-demand, here are chaptered clips and the comparison sheet. Join office hours if you want live Q&A.”
- No show (registered): Nudge with one asset. Example: “We saved the recording. Here is a 7-minute segment on pipeline attribution.”
Chat messages
- Pain: Mirror their words and solve it. Example: “You mentioned attribution is messy. Here is a checklist for webinar event syncing and a 10-minute setup video.”
- Buying intent: Move to clarity. Example: “You asked about pricing. Here are packages, common usage tiers, and a case study from a similar team.”
- Objection: Acknowledge and bridge. Example: “You use Salesforce. Here is how teams run campaigns with our HubSpot-native events and sync to Salesforce.”
- Tone: Match technical or strategic depth. Example: Technical → implementation guide and sandbox demo. Strategic → ROI one-pager and executive case study.
Q&A questions
- Feature specifics: Send a clip and checklist. Example: “You asked about multi-host controls. Here is a 3-minute clip and a role setup checklist.”
- Integrations: Route to the right path. Example: “Your HubSpot scoring question. Here is the playbook for event-based criteria and lifecycle stages.”
- Urgency: Adjust speed and cadence. Example: “You asked about deployment timelines. Here is a 2-week rollout plan. I can map it to your calendar.”
- Compliance: Reduce risk with proof. Example: “You asked about data retention. Here is our policy summary and audit FAQ.”
Poll answers
- Role: Tailor framing. Example: Marketers → pipeline attribution. Sales → meeting generation. Ops → reliability and governance.
- Maturity: Match level. Example: Beginner → templates and walkthroughs. Intermediate → benchmarks and optimization tips. Advanced → automation flows and experimentation frameworks.
- Priority: Align CTA to goal. Example: Pipeline → ROI calculator and case study. Adoption → onboarding journey. Education → product academy and content hub.
- Tech stack: Reference their tools directly. Example: “You selected HubSpot + Salesforce. Here is the integration map for events, campaigns, and attribution.”
CTA clicks
- Content download: Reinforce path. Example: “You downloaded the attribution guide. Here is a worksheet to estimate ROI with your current channels.”
- Demo: Increase speed and specificity. Example: “Here is a calendar with a demo agenda focused on integrations and scoring, based on what you viewed.”
- Pricing: Send tailored packages. Example: “Here are packages for your team size and usage, plus a 2-sentence ROI example from a peer.”
- Case study: Provide adjacent proof. Example: “You viewed a B2B SaaS case. Here are two similar stories and a short plan to replicate their results.”
- Contact sales: Move to action with their words. Example: “You clicked Talk to Sales. You care about Salesforce sync and attribution. Here are next steps and two time options.”
Making the most of your event data in HubSpot
With Marketing Events it's easier than ever to start using event data within HubSpot. From automated workflows that take the right action for more or less engaged leads – to lead scoring contacts based on their engagement.
However, if you want go deep and beyond attendance – it's worth checking out Contrast. The webinar platform built for HubSpot. With engagement data it becomes easier than ever to accurately score leads and create workflows that drive business results.
With that data, most of it available as property, it becomes then incredibly easy to build performance dashboards that help you understand how webinars are affecting revenue and more.
FAQ
What's the benefit of using HubSpot Marketing Events?
Event registrations, attendance, and no-shows live as properties on contacts and companies, so sales and marketing see the same truth without spreadsheets.
What type of HubSpot subscription do you need for reporting?
All plans, including free. Pro and plus to enable workflows.
Do you need Contrast to follow along?
Nope, Marketing Events work with the majority of webinar platforms. However, the simplicity and data availability per platform will differ. If you don't want to doubt, use Contrast.
What is the best webinar platform for HubSpot?
Contrast rated the best webinar platform for HubSpot on the HubSpot Marketplace with an average of 4.9 out of 5.0
Can you use Marketing Events with offline events?
Yes, you can. You'll find the event type property that you can use to specify this. This guide has mostly been written for online events (webinars etc..) though.